Tuesday, November 12, 2013

Re-assembly of the 4G15 - Going Through My Photos to Recall HOW!

Its been a year of playing with the motor and we are in the dark about some of the bolts and brackets.
Hoping the collection of images and parts manuals will help.


Monday, November 11, 2013

Progess > 4G15 Oil Return Complete & 3port Installed


/an10-oil-return-lines-evo-colt-mr258477.html

Slowing tidying up the car, which will never end @_@
Got a big list to go, but I got a couple things done.

<- I really wanna cut off the old internal waste-gate and clean up the water lines. Use some banjo bolts or AN fittings.


I used some fire sleeve on the oil return, protect it from the dump pipe.


< The 3port and the overkill industrial hoses.
I mounted it to the OEM bracket, tapped some threads on the solenoid.
I am tempted to mount it on a rubber pad to counter engine heat and vibrations.

Tapping the hose line fittings /doing-it-right-1st-time-taps-dies-must.html
Shopping for the 3port /3port-boost-solenoid-adaptronic-with.html
Cleaning the gate /turbosmart-comp-gate-40-new-116npt.html

Friday, November 8, 2013

Doing it right the 1st time - Taps & Dies - Must have in all tools boxes - 1/16 NPT


My turbo had a 1/4" UNC grab screw fitted. I searched high and low for a barbed fitting that I could use. Nothing was easy to come by or non-existent.
I bought a brake nipple that i planed to use, but it was thinner than a normal 1/4" UNC.
Next I began my search for a 1/16" NPT tap, most shops hadn't heard of it, or know what it is.
Lucky I came across a Goliath poster, got in touch with them and tracked down a distributor.
A complete week after i began the mission of tidying up the boost and oil lines @_@


The next struggle I had was the zero clearance for getting to tap into position @_@
/3port-boost-solenoid-adaptronic-with.html
/turbosmart-comp-gate-40-new-116npt.html


Used some fittings and reverse hex bits, still no go.


Got lucky and played with some fittings and sockets and adapted it to my screw driver.
The tap would wobble, but I didn't care, I needed a thread even if it was a bit off centre

Finally! a proper fitting. That little fitting has costed me alot!

Tuesday, November 5, 2013

-AN10 Oil Return Lines - Evo / Colt - MR258477


My car uses a MR258477 oil return gasket which I believe is common place on Mitsubishi turbos.
Hence i believe i can retrofit evo or vr4 oil returns.


What a bitch it was, wrong bolts were supplied. Oil drain attachment flange had to be cut and refaced. The turbo vband didn't provide enough clearnce.


AN (Army-Navy) Fitting Thread Size Chart
AN Size   Hose Size   Thread Size   mm
-3 3/16 3/8-24 SAE        4.7625
-4 1/4 7/16-20 SAE       6.3500 <- what I plan to use to upgrade the boost control system
-6 3/8 9/16-18 SAE       9.5250 <- what I plan to use to replace fuel lines
-8 1/2 3/4-16 SAE        12.7000
-10 5/8 7/8-14 SAE        15.8750  <- whats used in this kit
-12 3/4 1-1/16 SAE        19.0500
-16 1 1-5/16 SAE        25.4000
-20 1-1/4 1-5/8 SAE


<Sump fitting

Resurface the flange >


Another common fraction:
5/16 7.9375mm


< OH LOOK> NO CLEARANCE FOR A SOCKET!


-AN10, new gasket and loctite no3


www.gtpumps.com.au/oil_lines.html

How it should have been designed, had to go get new proper bolts!


I believe this was included in my kit:
2 x AN-10 to M16 x 1.5 Metric Straight Adapter
1 x AN-10 X 90deg. Push lok barbed hose fitting
1 x AN-10 X Straight. Push lok barbed hose fitting
2 x oil drain adapters
2 x MR258477
2 x M6x1mm (useless! not enough clearance to use them, had to go get allen key bolts)

<Can u see i temporary looped it>
AN fittings are to large and interfered with each other

------------------------------------------------------


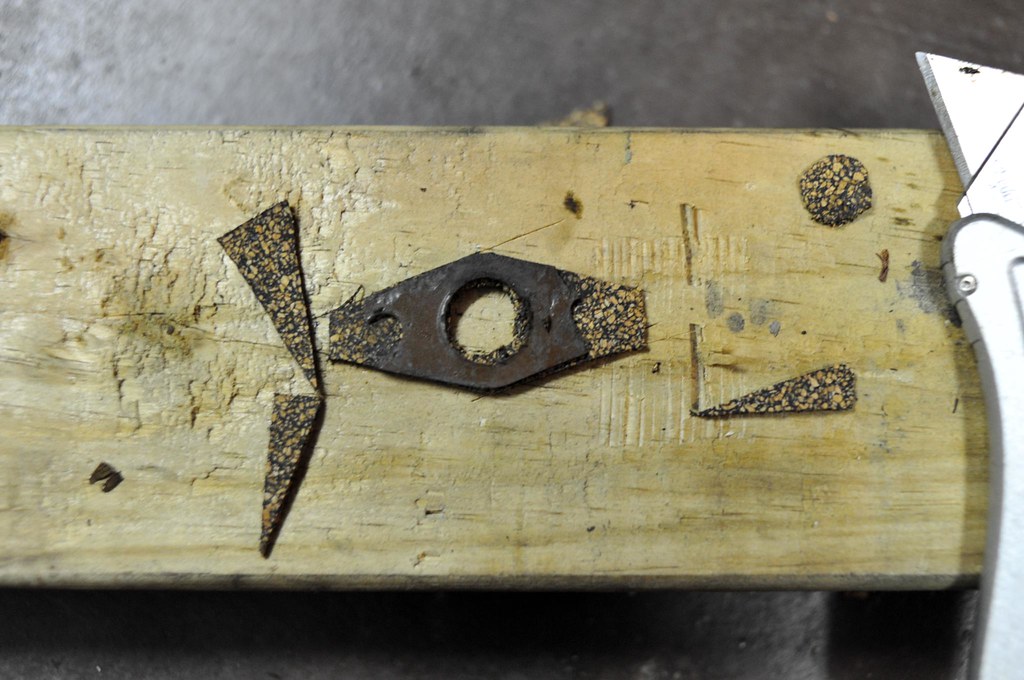
Back in 2010 I did a cork gasket install -
done a standard oil change...going to dyno soon wanna get car ready...
notice a while ago the gasket on the oil return line to the sump was leaking...
made a new gasket out of cork, hope it holds
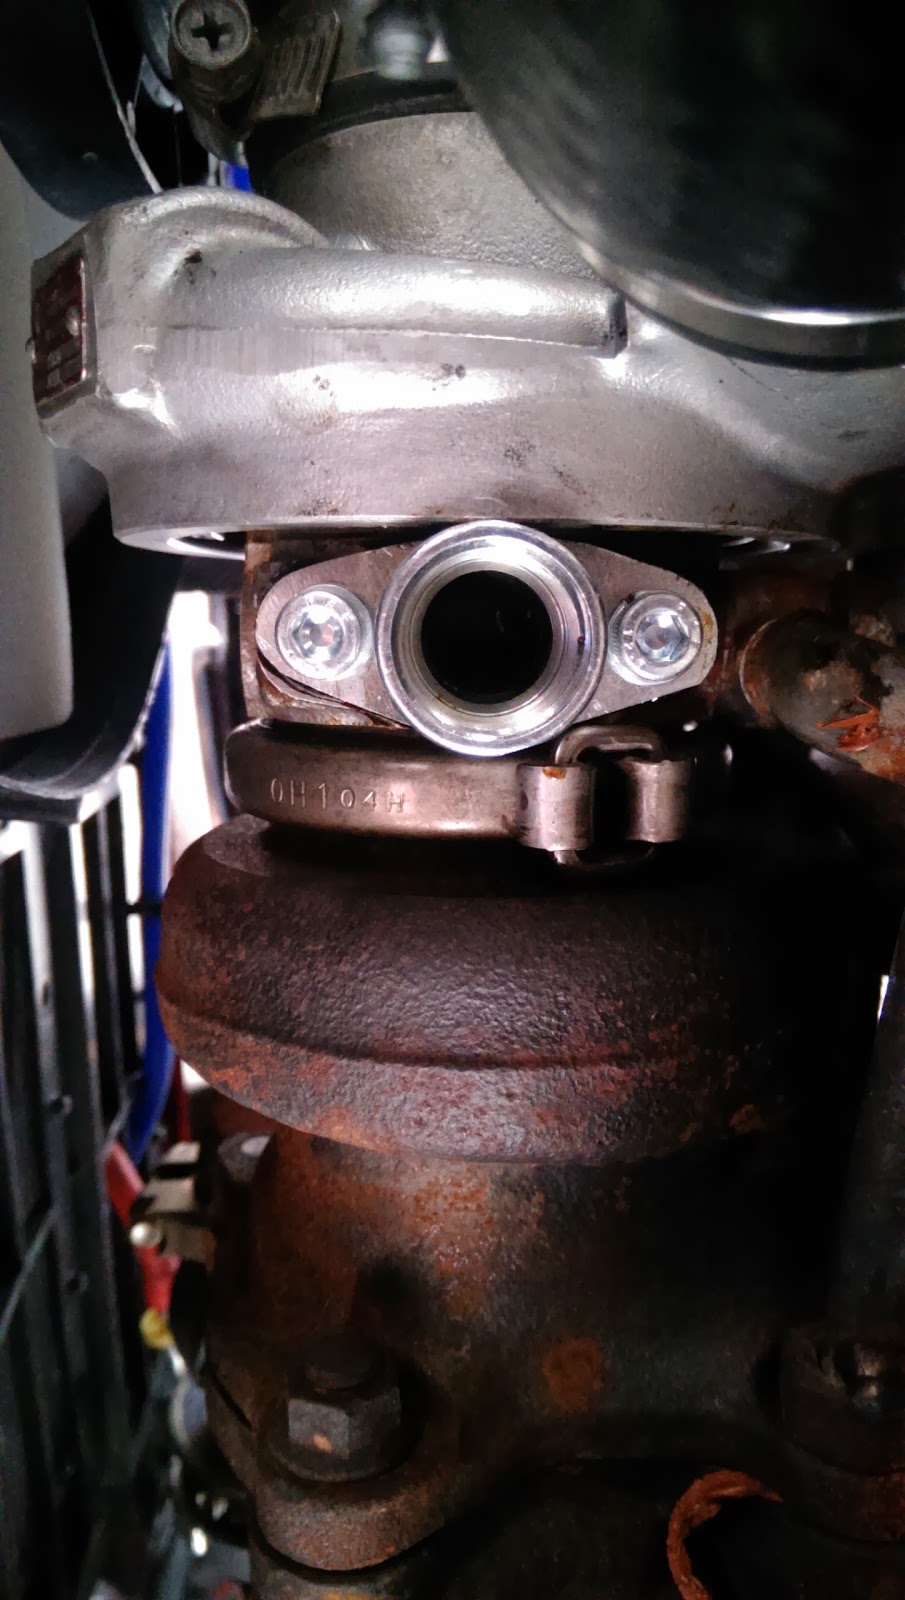
added an oil temp sensor i got from a friend...will wire it up another day, but it is mounted...used teflon tape to seal
used the evo oil filter it is not as long, hence more clearance Z436


Monday, November 4, 2013

My Final Version of the RColt Shifter Linkage Upgrade - Solid Rose Joint

So I have been through a couple different versions of the shifter linkages.


My first upgrade was to a solid urethane insert when the old rubber one broke when removing the gearbox from the car > /solid-shifter-linkage-and-custom.html
This was the broken linkage /gearbox-drop-part-7-broken-gear-linkage.html

Surprisingly this lasted a couple years. I believe I added some WD40 to the bushing a few months back, that when it first popped off while driving. I am wondering if the WD40 ruined the insert I had.


So instead of fixing it, I just made a bracket to hold the linkage on and stop it popping off.
This worked a treat /z27ag-shifter-linkage-repair-bracket.html
A Jap forum goer has the exact same idea as I did /semi-solid-shifter-linkage-from-minkara.html just executed a little differently.

Now is my final version using a rose joint / rod end bearing or whateva you wanna call it.

< after removing the whole assembly from the car, it all went crazy


So I cut the old one off with an angle grinder, then i needed to thread an M6x1mm rose joint.
Out came my die to cut the thread.
Metal was fairly soft, so it wasn't too hard.


< M6 die


Angle grinded the ball stud off the gearbox
I had a high tensile M6 Bolt that would be the new attachment for the linkage.

< That little coil, is some wire i belt up, as the original ball stud was a little bigger than my new bolt, the wire will stop it moving


Large flat washer on either side of the bolt, I was tempted to put a bit of weld on it, but it seem tight enough.


The nylon nuts are M6, i drilled the threads out of it, i wanted something soft to surround the rose joint. Then i used a normal M6 nut to get it in the right position, then i added a cone lock nut to stop it coming loose.

FN2R - Civic Type R 2007 - Brake Service - Bendix Pads


<- Rear piston retracting tool

Had to do a brake pad change for the Civic Type R. It had about 80k km on the clock, I am not sure if its the first time it needed pads, but all 4 were well gone.


Rears are a TRW caliper and the fronts were NISSIN ->
Piston must be turned clockwise to wind it back, release hand brake.
If its not going in, try wind it a little out then back in, apply pressure when pushing it back in. I use a drill attached to help.
You can use long nose pliers, but u might damage the piston or go crazy if its not playing ball.

It must have a very balanced bias, or too much at the rear if its chewing that much.

No difference from any other brakes, single floating pot at the front. G clamp to retract the piston. You can crack the nipple open or just remove the brake fluid refill cap.
We were doing a full bleed, so any suited.


< Fronts, the usually retaining clips


Rears using a 13mm and 15mm to remove the retaining pin >


Needed pads ASAP hence Bendix, no stock of the REMSA or FERODO
DB2177 GCT for the Rears
DB1452 GCT for the Front.