What I have fitted.
QDF38Z was the diff i put into my car which apparently is from a getrag box in a mini cooper.
I then found out there is a Ford diff available for our car, well not exactly our car but it is common between SVT Focus / Mini "S" / Getrag 6 Speed
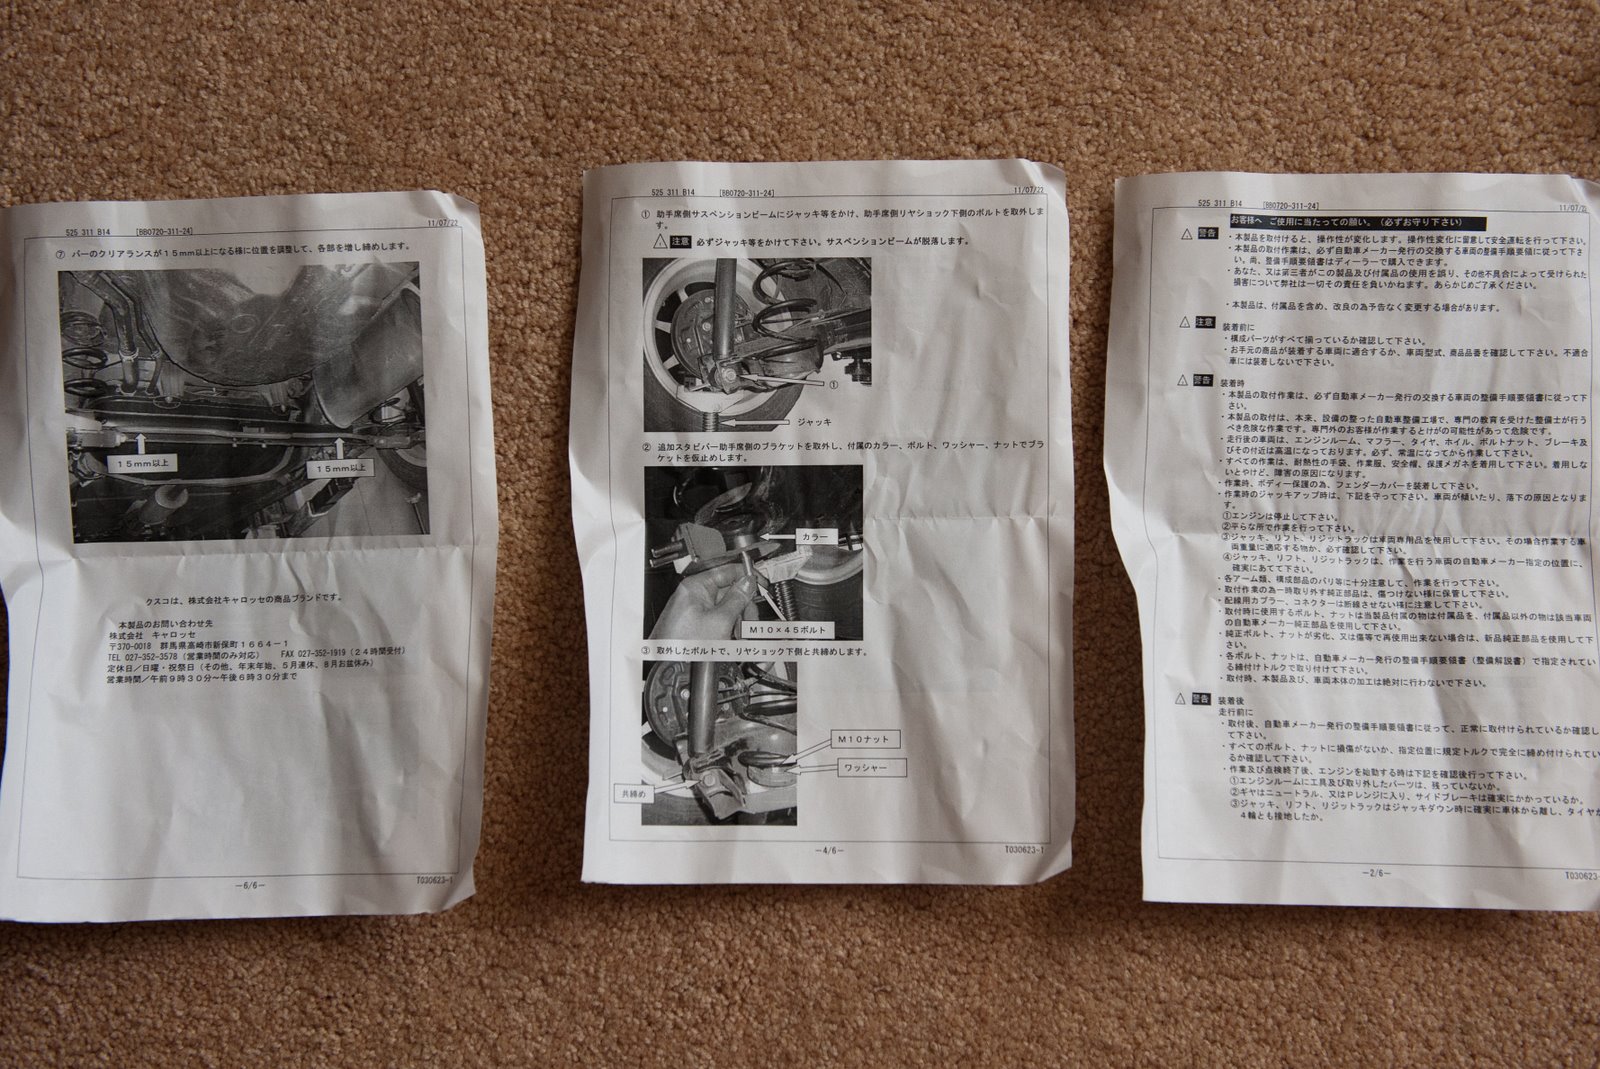
Install Part 1
Install Part 2
Mini Cooper Install Video -
http://www.youtube.com/watch?v=KPXZIOB9QiM
Info from
here
"I contacted Quaife UK directly, and received somewhat vague confirmation that the Quaife ATB differential (model QDF38Z) will fit/work in any Getrag 6-speed manual transmission for the MINI (R53 or R56). Indeed, the same model (QDF38Z) is listed for both MINI listings on Quaife's own site, as well as for the Ford Focus SVT/ST170 (precursor to the RS?)."
"QDF38Z works in ANY car that uses that particular Getrag 6-speed manual tranny, which from what I can tell from Getrag's information, is more specifically the Getrag GMTT280 FWD, 6-speed transverse manual transmission."
More pics of the mini cooper transmission
>>>
For any diff you will need a two of each, bearing and bearing outer race. You could reuse the race already pressed into the gearbox, but I wouldn't recommend this. As the bearing and race are usually matched pairs:
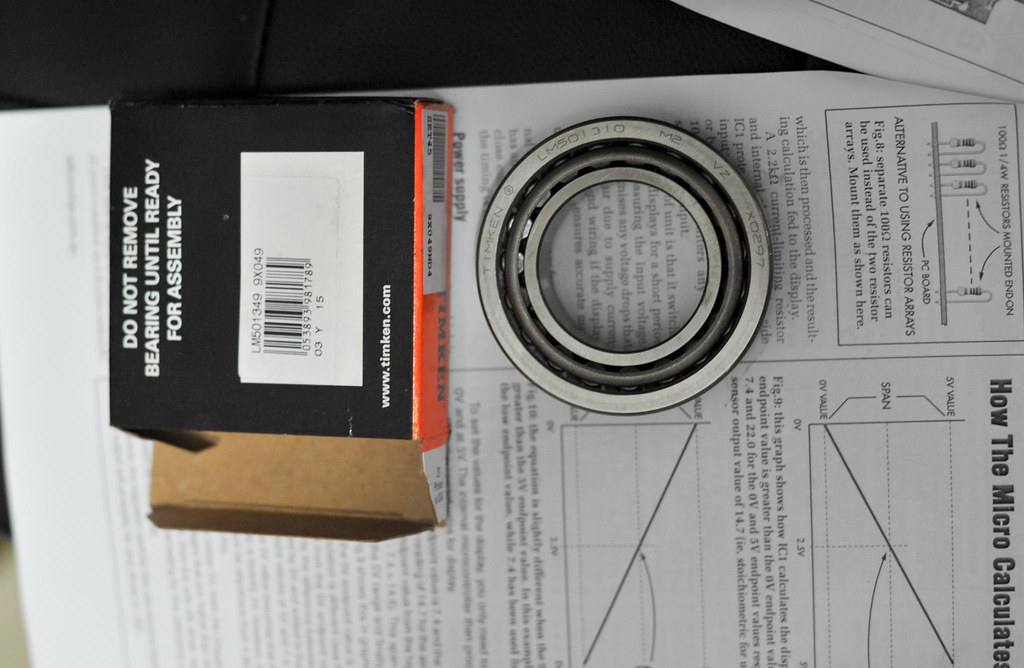
Ralliart Bearing Kit - RA930740K1
Timken
TIMKEN LM501310-X0297 outer race
TIMKEN LM501349-X0297 bearing
Kit - LM501349 9X049
These Timken tapered roller carrier bearings will fit all the differentials we sell, i.e. Cusco, Quaife (ATB), OS Giken as well as the standard BMW Mini Cooper S item.
These are also needed for the Focus SVT LSD.
I also came across Lohen bearings mentioned on the Mini forum.
NOTE: ALL PHOTOS ARE OF MY QUAIFE
Last image is of stock diff dimensions
More info here:
http://www.tousleyfordparts.com/partlocator/index.cfm?action=viewPrintablePage&partid=498783&siteid=214771&catalogid=5684
M-4204-SVTF Similar to M-4204-T2 but for the SVT Focus Getrag 6-speed transaxle Torque sensing, torque biasing differential Responds immediately to variable driving conditions Provides better traction, acceleration and handling than the factory open differential. Fits 2002-2004 SVT Focus.
http://s300909324.e-shop.info/shop/page/1?shop_param=
SVT Focus / Mini "S" / Getrag 6 Speed

Shipping weight 20 lb
Item number 975420-0209B
Price USD 625.00
Ford Racing M-4204-SVTF
Brand
Ford Racing
Manufacturer's Part Number
M-4204-SVTF

Part Type
Differential Carriers
Product Line
Ford Racing Differentials
Summit Racing Part Number
FMS-M-4204-SVTF
UPC
756122088371
Aftermarket Carrier Style
T-2 Torsen differential
Axle Location
Front
Make
FORD
Model
FOCUS
Submodel
SVT
Beginning Year
2002
Ending Year
2004
Stock Case Style
Open case
Cusco Part Numbers
LSD 440 C15 - Mitsubishi - Colt Ver. R - Z27AG - Front - 1&1.5 Way Model - 1.5 Way
LSD 440 F -Mitsubishi - Colt Ver. R - Z27AG - Front - 1 Way
Ralliart Front Mechanical LSD Kit
RA250113S1
\ 139,650 (base price \ 133,000) shop price ¥ 125280 (tax included)
1.5WAY, multi-plate, (six inner claws, four claws outside) 10-plate
about 98N · m initial initial value (single measurement value 49N · m)
cam angle 45 ° / 15 ° -35 ° / 15 °
mounting two came with tapered bearings
<Repair Parts>
tapered roller bearings (single)
RA930740K1 \ 5,250 (\ 5,000)
steel retainer
There is also an
OS Giken Clutch Pack type therefore 100% bias compared to the 75/80% you here about for the Quaife
I believe the part number is MN023-HA
R50/R53/R56 1.6L MT only
----------------------------------------------------------------------
Pointers:
- Loctite 5205 - to seal the box
- use a punch to remove the doles
- don't use a pry bar or screwdriver on the box edge, use the pry points and a rubber hammer
- lift off straight so you don't damage the input shaft seal
----------------------------------------------------------------------
On the Focus SVT Forums you can find more information on the install. It is quiet similar.
The gearbox shape and clutch fork is different but the principles are the same.
Focus Fanatics
Youtube Video
I am not to sure if the seals are the same, but the bearings are:
Ford Part Number
# B7A4221A (Bearing)
# B7A4222A (Race)
Output Shaft Seals (Ford)
# 2M5Z1177AA
# 2M5Z1177BA
Other brand bearings:
Front Diff Tapered Roller Bearing ID:
NSK NTF LM501349
Front Diff Bearing Race ID:
NSK NTF LM501310
----------------------------------------------------------------------
Bits and pieces on the mini gearbox a good read
>>>> especially the clutch bleeding process
"Note the ghetto fabulous tool we made to keep the slave cylinder compressed for bleeding.
Go ahead and bleed the slave cylinder. It will take some time, since there’s bound to be a whole lot of air in the system because of the new pipe and slave cylinder. Remember to keep topping off the brake fluid reservoir as you bleed the cylinder. The best way to do this is manually, pushing the clutch lever in, opening the bleeder valve, and repeating until you see no air bubbles. Note that you may have to manually lift the clutch lever off the floor between bleeds. Once you have ensured there is no more air, remove the compressor tool and put the slave cylinder into its bracket on the lower front of the transmission"
----------------------------------------------------------------------
Why I went helical diff?
in reference to my post on the rcolt forums. it was a reply intended for most of the people i observe on this forum (i could be wrong and there could be some track weapons lurking)
stating that helical is still a viable option for people that do ciruit work...and not reserved for just drags etc
if ppl wanna learn more and get a more informed decision i would be recommending them reading up on hondas. as they are frequently raced and have a bunch of different lsds available and they are FWD.
e.g.
Honda
the users i have seen over the years are not super serious at building track machines...more so into spirited drives and occassional track use and dont want there car having gearboxs dropped and clutch pack lsd being serviced
hence the way i summarise is that the true metal/clutch pack lsd tend to be used by more serious cars and drivers where performance outweighs any of the inconveniences.
and i believe most users would prefer the more convenient helical lsd (i also fall in this group as my car is a daily)
and i do believe obx are weaker due to them being cast, and can have tolerance issues. so maybe shy away from obx diff in your box even though they are much cheaper.
quaife like the wavetrac are machined..to oem tolerances
----------------------------------------------------------------------
Some review from
Minkara
1.5WAY multi-plate plates 10 specifications (4th out of each sheet in the sixth) 45 ° operating angle of the Type of itself an CUSCO-RS (OEM) for low initial torque, adept at handling ease, chattering sound Yes that is also reduced. And then boasting is Okimashi far, is actually riding impressions. First, the steering becomes heavy, the greater the ability to revert to the center. So 1.5WAY, not much changed even when the accelerator-off behavior. Once you get used to not feel much discomfort. (Intuitively, YOU want to feel like when we changed from a stud ... Neoba destroyed.) Also, as the slogan, almost no chattering sound. If I'm forced to say, when you can just say Gakogako garage or out in the cold. Furusutea (enough to hear a little sound) what. (In rare cases, the nature of the LSD is unavoidable It may feel a vibration and knock) Then, the performance is the surface, so the first LSD installation, there is no attempt to compare. So, write your feelings. As there are other reviewers who will go off in the direction of steering and Guigui. → ASC proceed to operate the spinning tires in that far. Corner and also because the drive is transmitted securely to the side out, and dramatically increase the escape rate. Once at the road and benefit all, what we can accelerate to full speed in 1.2. (Eg when leaving the store parking lot on the road) , however, have a sense of place as an element of anxiety is likely to depend on the performance of the tire. Low initial and although the direction and force advancing the power of leverage high-grip tires, will probably lower limits of the tire performance is low. With respect to oil, 75W super gears of BP-90EP (GL-5) is put. Mission and the oil迷Imashita CUSCO, GL standards for CUSCO-3, so then I end up here. The combined capacity of up kit BFM,様子見put in 3L. In the introduction of this part, further heightened interest of Colt. Purchase price, the auction price. In driving out of 2,000 km, the debris was a little back into gear, many of the goods was not a problem (^_^) function for labor, because labor there is no table, or claim actual expenses, the Ralliart As labor is calculated at eight hours and directions.
 Had to modify the bar as the bolts didn't line up. Expanded the holes around 2mm on each side, oval shaped. Very surprised as Japan stuff has always been spot on. I had no white paint so I used black to rust proof it.