Monday, March 31, 2014

7 Days to turn the Key - Project Build - 4G15


/progress-yet-again-forged-4g15-turbo.html

< we cleaned up the plenum as best we could, removed the 90degree edge, and tried to contour it as best as possible
/4g15-mivec-forge-build-nearing.html

Two souls set out on a long road and its finally come to the end. All we need is some gasket goop for the exahust manifold and install the turbo and put oil and fluid in the engine.


Lower injector insulator / lower cushions / Seal ring >>


We need new Fuel Injector Sheets / fuel pipe insulator / grommet >


- redid all the FMIC pipe work (not shown)
- install fuel reg, fuel rail spacers, lower injector insulator
- clean all flanges
- install fuel rail with new seals and o-rings
- new tb gasket & new intake plenum gasket
- old OEM turbo is going in for the short term


Sunday, March 30, 2014

Cosworth Break-in - Thought I would use it as a guide

Before Starting
During the break-in process, we recommend using a high quality API SJ or newer mineral 20W-50 engine oil. We also recommend using a genuine Subaru oil filter. Do NOT use a synthetic or synthetic blend during the break-in process. Replace the oil immediately after the break-in procedure or 500 miles
(whichever comes first).


We also strongly recommend priming the engine’s oil system before starting. To do this, make sure there is no fuel or spark by disconnecting either the ECU or by removing the appropriate fuses and/or relays.


Then crank the engine until there is oil pressure registering on an oil pressure gauge (you or your mechanic must install one). When first starting the engine, be sure to keep the engine speed above 2000rpm to ensure the tappet buckets and cam lobes have adequate oil.


Engine Break-in
It is critical that your Cosworth engine is not started with an excessively rich fuel mixture. An excessively rich mixture will wash away the oil in the cylinders and the rings can potentially never break-in causing excessive oil consumption, crankcase blow-by and lower power output. This damage is permanent.


If the engine will be broken in by driving the car, we recommend you keep the engine speed below 4000rpm. Drive the vehicle at various loads, speeds, and throttle positions while keeping engine speeds below 4000 rpm for approximately 1000 miles or 1660 kilometers. The longer the engine is broken in, the better your results will be. If breaking your engine in on an engine dynamometer, follow the break in procedure detailed below. You can use the guideline for a chassis dynamometer as well, but load readings will differ. If using a chassis dynamometer make sure to keep water temperatures below 95 degrees Celsius and oil temperatures below 110 degrees Celsius.
• Run at 2000rpm @ 50-60 lbf-ft. load for 20 minutes
• Run at 3500rpm @ 90-100 lbf-ft. load for 20 minutes
• Run at 4250rpm @ 100-110 lbf-ft. load for 10 minutes
• Run at 4250rpm @ 125-135 lbf-ft. load for 5 minutes
• Run at 5500rpm @ 125-135 lbf-ft. load for 5 minutes
• Run at 5700 rpm @ WOT for 2 minutes (not to exceed 300 lbf-ft.)
During the final break-in stage, the boost should be limited so as not to exceed 350 lbf-ft. of torque.
Some initial ECU calibration activity may be required to complete break-in with proper air fuel ratios. The engine should be calibrated to achieve an air fuel ratio rich enough for the type of fuel you are using.
Consult with a professional tuner if you are unsure of an air fuel ratio the engine requires. Boost should
be regulated so as not to exceed 300 lbf-ft. of torque during the break in process. Once ECU calibration is complete up to 7000rpm, the short block should be ready for a WOT, full power run throughout the entire power band.

Monday, March 10, 2014

Over Fill Kit Installation - Gearbox Oil Filler for a Getrag 4G15


INTRO - 

Allows you to fill gearbox without spills and without removing the filler bolt every time.
Also lets you run additional fluid (I run about 2lt, Japanese boys run up to 2.2lt) and no you won't pressize the gearbox as it has a vent on it.
If you are really scared you can put a breather on the end of the hose rather than the blocked hose tail I have provided.
To fill via this device, either use those bottles with the pointed filler/squeezy bottle or a TOM THUMBS pump.
I use Tom's pump because I buy gearbox oil in 5lt cans.
I recommend Neo Racing, Royal Purple and Amsoil.
And no this is not a debate on oils.
Expect at least 3-4 weeks before I close this gb. Bit busy atm.
Gearbox bolts are a M18x1.5
< lubing up the dowty washer


Japanese Description - 
Our product is a part of to put more than a specified amount of a normal mission oil.
Product is a utility model acquired parts.
I can expect the effect a simple installation. You can easily MT oil change.
 Effect in the parts attached
Injection of 1.5 ℓ many oil 1 ℓ ~ than normal oil specified amount of mission, and suppress the oil temperature rise of the mission oil.
Is designed to maintain the weight of stress-load-bearing pole shear stability of the oil itself, reduce the oil temperature rise.
Is effective in protection mission (such as gear synchro) by securing a reliable oil film.
I will contribute improved shift feel, the long life of the transmission oil.

Continued - 
After seeing many people complain about filling their gearbox and not knowing how much fluid to add, spilling fluid, having air pockets blah blah blah

I promoted the idea of my over filler kit I have been using for a couple years now. Inspired by the Japanese one, I decided to piece a kit together.
Not as cheap as one would expect, but I feel after one use it pays itself off.
I have a carbon LSD hence I need to change gearbox fluid.
First developments here: /home-brew-overfill-kit.html
How to change fluid: /how-to-change-your-gearbox-oil-in-rcolt.html


< someone complained the threads aren't long enough, hence i show a comparison

I dont use a washer at all, but i decided to provide a dowty washer which helps seals from leaks and in theory stop noobs over torquing (but i have learnt this is impossible)


OK! PLEASE READ
This is a tapered barb, see how there is 5 barbs. Some gearboxes may not provide clearance to screw it in. You may have to cut off one barb to lower the profile.

I have put it on 3 RColts now without issue.


OK! NEXT PLEASE READ
You install the adapter bung which is a M18x1.5 for the RColt. Install hand tight, and maybe use a spanner or socket to turn it a half turn more. Just so it seats


Then you install the right angle barb, do this hand tight till it stops. You maybe find it points down or to the right etc.
You want it up, so you use a shifting spanner to rotate it. The tapered barb has tapered threads so it will self tighten.
You don't have to hold the bung, it should grab enough to let you turn the tapered barb.
Becareful not to over tighten. ITS LIKE TIGHTENING YOUR HOME TAP TO STOP WATER.Is the best explanation i can think off, a nice tight solid turn till it stop.

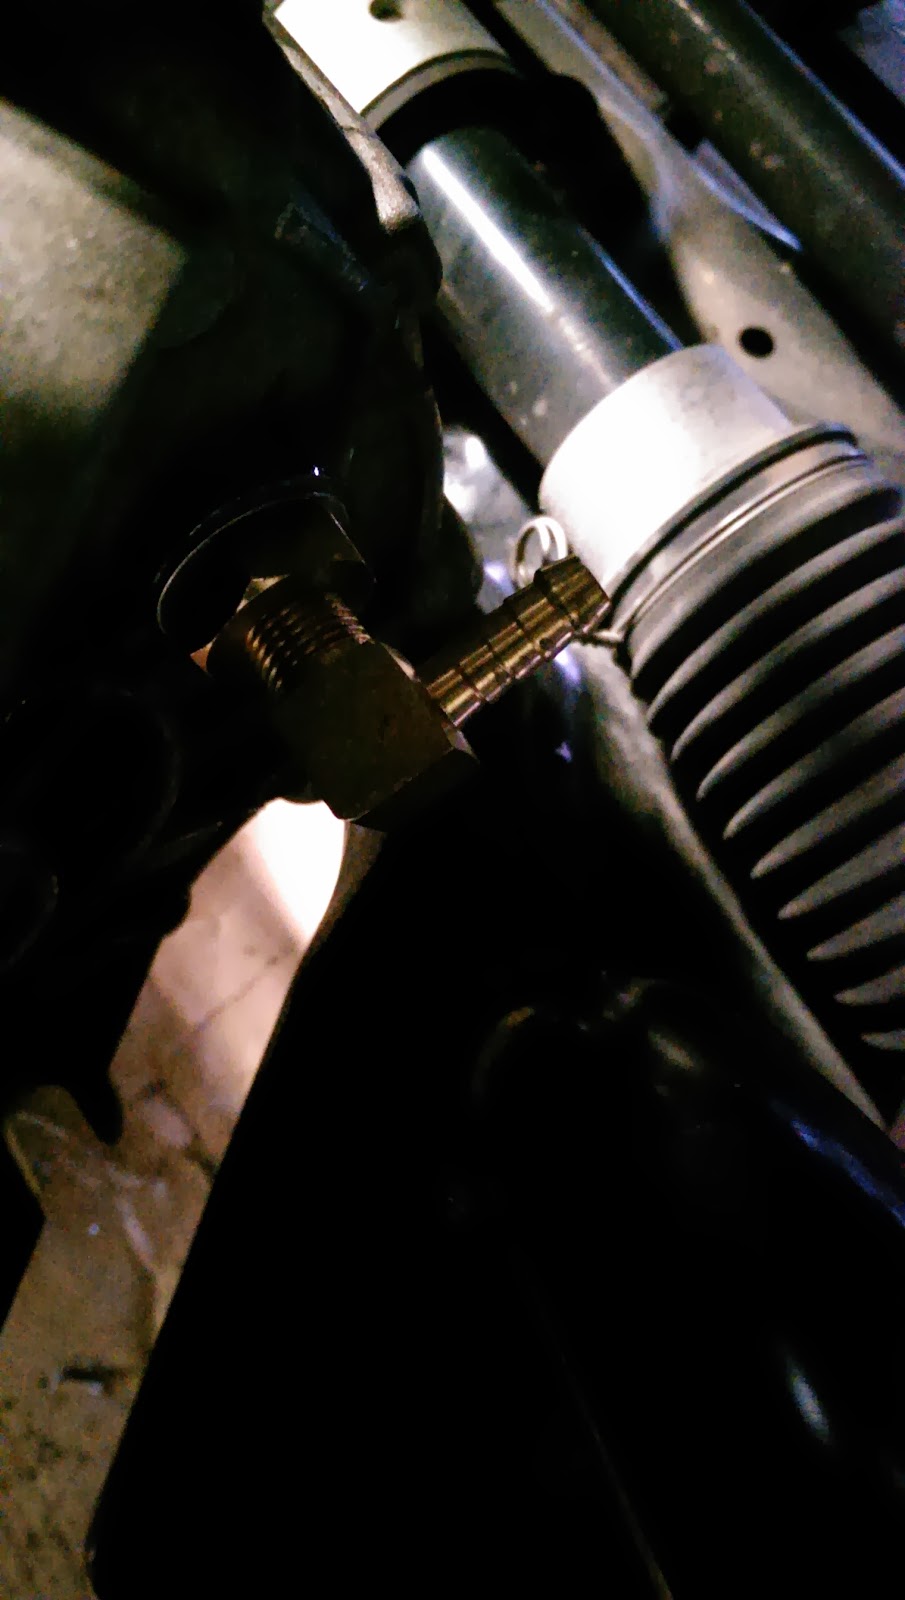
<- Install hose clamp


I gave some extra hose, you can cut off un-needed hose. I run it up behind the ABS and over to the ECU out of the way


The dowty, the bung, the right angle tapered barb and the hose clamp

You can add some teflon thread to the right angle barb. Just go around twice, but its not compulsory if your  install it correct


The cap, tapered hose tail, hose clamp.


*I use a Toms Pump to fill up via the hose and run 2lts of fluid

Progress Yet Again - Forged 4G15 Turbo Makes It Way Home


If you have been following the build, it has almost reached turn the key stage
/adams-forged-ralliart-colt-long-motor.html
And as always, I try to document it all.


All the tools needed to build an engine. This engine is not in my home so every weekend I must visit it.


Scoping out the gearbox mount, I see another project.
We remove mounts as we plan to pull the engine up into them


Last time it should see the crane, we hope.


The gearbox needs to drop below the chassis rail so that the engine can be lowered in.
We do by maximising the install angle, getting the gearbox under the rail, lower it as much as possible then rotate into position then lift it into
the mounts.


Then we put the alternator on and belt, plenum mount and a few other small things.


Fuel EVAP delete :) So much cleaner. YAY!


Re-used the one way valve that was coming from the throttle body so that the tank doesn't get pressurised when on boost
In theory when the tank pressure builds up, this valve will release the fumes.
I plugged the other end into the OEM EVAP canister exhaust line


And here i mount the EVAP canister bracket for a fuel reg, out of the way and away from heat.


Friday, March 7, 2014

Learning How to CAD - If you want it done right, do it yourself


One thing with cars I have realised is that its hard to find good people. Well, unless you can afford them @_@
So I set off on a journey to learn things myself. And here I am.

As seen here:
/diy-dog-bones-for-my-ucf30-calipers.html


To get a set of brackets from Japan costs $1000AUD, I have no idea how much I need to invest doing it myself, but its the satisfaction.


Monday, March 3, 2014

DiY Dog Bones for My UCF30 Calipers - Ralliart Colt 4pot Conversion


Previous posts on my UCF30 calipers:

/ls400ucf20-or-ls430ucf30-front-brake.html
/calipers-arrived-ucf30ls430-sumitomo.html
/monoblock-rebuild-kit-04479-50130-lexus.html


Next step is to make my mounts in wood so I can get some rough dimensions.
Then to get them done in some billet aluminium.
Then to invest in some bigger rotors, then to restore my pair of 16x8 wheels so that I can clear the brakes :)
Minimum is a 16" wheel to clear the bigger brakes. I will have to use my 20mm spacer as well.


I rarely work with wood, so making the shapes was harder than expected. I used my airsaw, dremel and bits and pieces to craft the shape. Surprisingly the bolts actually threaded into the wood lol.
They are M12x1.25 by 25mm.


Using the dremel to cut out a recess for the offset bit.


The offset bit wasn't longer enough :( by a whole 10mm FARK!
So I had to extend it, I used another piece of wood and made some dowels.


Currently it just touches the rim, i know why. It the wood, it needs to be shaved down ~4mm


Thats how the bracket looks, it needs a lot of trimming.


Bolts I use to hold on my Evo 3 calipers.