Paddle/Puck or Button
These clutches are sometimes quite unusually shaped and have relatively small areas of friction lining on each paddle. This serves to reducing the overall contact area acting upon the flywheel when compared to a full-face clutch. With no other accompanying changes, fitting one of these will give a higher maximum clamping pressure (pressure = force / area) and will therefore deliver more resistance to slip.
Isaac there are, however, some problems with simply installing a paddle clutch with no other changes. Because the total contact area of the clutch is reduced, the rate of lining wear is increased, clutch engagement is more sudden and shudder can also be encountered on take-off.
Full-Face Type
The vast majority of factory cars come equipped with a full-face clutch plate. These have a friction lining that extends around the entire periphery of the clutch plate with no large gaps. Full-face clutches offer smooth engagement and a long service life but, depending on the chosen friction material, require a highly rated pressure plate in a performance application, or they wont last very long.
Hybrid type
There are combination full-face/paddle clutches now appearing in the form of full (or near full) circle clutch plates, which are fitted with small areas of friction material. These come with a varying amount of lining area and are a great compromise for someone after some of the advantages of both full-face and paddle clutches.
The appropriate pressure plate rating and engagement smoothness depends on the area of the lining material of the individual clutch plate. The clutch plate itself is often more substantial in construction when compared to the more sculpted paddle types - the trade-off being increased mass.
Multi-Plate type

Multi-Plate clutches are becoming increasingly popular in the aftermarket, especially amongst high-performance Japanese vehicles like ours. But theoretically, they should only be used where there isn't enough room for a larger diameter clutch. In the case of a multi-plate design, the total friction area is greatly increased, as there are multiple clutch plates. The advantages include an ability to get away with low rated pressure plate, which gives lighter pedal weight. The trade-offs are the possibility of shudder and noise during operation. Only the more expensive high-performance factory vehicles, such as the twin-turbo V8 Lotus Esprit, run a twin-plate clutch as standard, i havent heard of any other vehicle requiring it, unless someone else knows different.
Inners................................
Clutch Centres and Cushioning
Most factory cars come fitted with a sprung centre to aid engagement smoothness. These units have a series of small springs located radially around the hub that allow the clutch assembly to rotate slightly upon engagement to the flywheel. This helps to smooth out any torsional fluctuations and vibration that would otherwise be passed on through the driveline and cabin. Damping the movement of these springs are small friction washers fitted between the hub, retainer and adapter plate.
Not surprisingly, a solid centre clutch plate doesn't have any springs fitted as the cushioning media. And because there is no "give" upon engagement, its operation is much more ragged - making it less suitable for road use. The primary goal of a solid centre is to achieve the highest possible strength and durability under extreme conditions, ie performance cars.
However, solid centres can sometimes be used conjunction with a "marcel backing" around the outer edge of full-face clutches. The marcel is a wavy material-lined backing on the clutch plate, which gets progressively compressed and released against the flywheel and pressure plate in relation to pedal movement. This design is sometimes used when some form of softening is required on the take-up of the pedal, and when space limitations within the hub prevent bigger hub springs from being fitted. The bigger hub springs are used when backing a high-torque engine.
I previously mentioned the Lotus Esprit uses this design to soften the operation of its factory multi-plate clutch arrangement. For a road car, this has a positive effect on clutch pedal feel between the engaged and disengaged positions.
Clutch Linings
There are three main types of clutch lining material available, with combinations of any two able to be bonded and/or riveted on either side of the clutch plate. Note that for each type of lining, alumimium or steel backings can be specified. This reduces the likelihood of high rpm clutch explosions, while the aluminium type backings have the advantage of reduced mass when compared to steel. The thickness of the clutch lining is also important. Thick linings offer longer service life and smoother operation, but aren't as suitable for race or competition applications. This is because their thickness doesn't offer quite as fast engagement, which equates to slower gear-change capabilities, its not always just down to the gearbox or your syncros !
Material
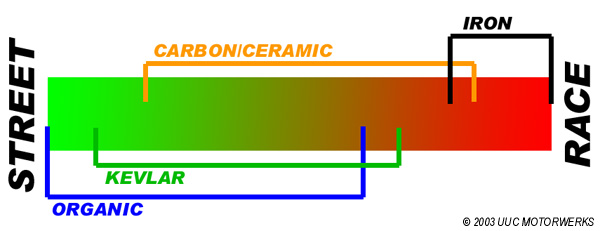
Organic
Organic linings are most frequently used on factory bog-stock cars as they are durable, smooth, easy on mating surfaces and cheap to manufacture. In a performance application though, they frequently show their intolerance to heat build up and clutch slip inevitably occurs.
Kevlar
Kevlar, like organic linings, needs a fairly high clamping pressure to maintain grip. This is because Kevlar's co-efficient of friction is similar, at around 0.30 and 0.35. Its biggest advantage over organics is its ability to withstand large amounts of heat. As a guide, up to 40-50% more can be endured, so long as it is being used in conjunction with a highly rated pressure plate. It also places virtually no wear on its mating surfaces and it quite a has smooth operation so I have heard.
Ceramic
Of all types of linings, ceramics offer the highest co-efficient of friction at around 0.48-0.55. This means they can be used with a lower clamping force pressure plate as the lining provides the grip. But because of this attribute, they cause a lot of wear on mating surfaces and shudder can be commonly encountered. Ceramics can take more heat than an organic material, but deliberately slipping the clutch tends to burn up the flywheel and pressure plate more than the lining. Made up from sintered bronze with ceramic material mixed in, there are a few different brands available that vary in their carbon content, but they are all mainly suitable for competition use and very expensive should you even want to find one for your Skyline.
Pressure Plates/Clutch Covers
Pressure plates squeeze the clutch plate against the flywheel, so they're obviously largely responsible for the total amount of holding force generated. Car manufacturers usually aim to achieve a light clutch pedal weight to make driving easier, and they do this by using a fairly marginal pressure plate load rating. The good news is the clamping force of an OE pressure plate can usually be increased by 50-100% by altering the fulcrum point and swapping or re-shaping the diaphragm. However, this amount depends on the location of the factory fulcrum point and the quality of the OE part can also be a concern. Some cars, such as Toyota GT-4 turbos, only have scope for another 10% pressure in which case an aftermarket pressure plate is usually required.
The maximum tolerable pedal weight is merely an individual opinion, but note that clutch cables (where fitted) can be stretched or overloaded if you go too far. On the other hand, cars fitted with hydraulic clutch actuation can be fitted with a pressure plate of substantially more load rating without excessive pedal pressure. Note that with a too highly rated pressure plate, it can also be possible to bend or break clutch forks and strain engine crankshaft bearings.