Wednesday, April 6, 2011

Axle Seal Replacement - 2960A032

had to put a new axle seal in, think we damaged it puttin the lsd in or me puttin the axle back (i think or just coincidence)

do note my new axle seal also had some minor damage @_@ hope it holds up, its on the outter side though

Replacement part numbers: 2960A032 gearbox seals, you need two

Parts list:

http://ayu452.blogspot.com.au/2012/10/possible-solution-to-my-cracked-clutch.html


marketing for our forum


me under the car...jacked up and on stands...safety! 


new seal which looks slightly damage and old. manage to pick one up on the same day i needed it :D


 you will have to drop most of your gearbox oil to do this...otherwise when you remove the axle oil will go everywhere.
i removed my front pipe for more working room also


ok...removal process.  remove the axles.
to do so take the hub apart, see a brief description how to do it when i put the lsd in.
once the axles are removed (i only did the driver side, i assume the passenger side is the same method.
there is a notch where you stick a flat head screw driver in and remove the metal ring
you can see the notch in the picture to the left.


Note the ring is already removed.

axle seal, diff case seal, pinion gear seal? its got a bunch of names...drive-shaft oil seal

to remove the axle seal i used a special crowbar style tool called an axle seal remover.
basically a big sharp hook that hooked the inner lip so you can pull it out


the axle seal and out metal cover


to install the ring i used a rubber hammer. do not hot the seal direct either use a big ass socket or an axle seal installer tool.
or what i did was use the metal ring. put the metal ring over the seal and gently tap it in
seal inserter universal kit - a tool used to install these type of things

Monday, March 21, 2011

Battery with Seat On :)

As requested someone wanted to see clearance with the battery...
I tested it with someone on the seat and still didn't touch. Approx 5mm or so with someone on the seat.
if i cut a hole in the wood it would of given me approx 30mm clearance.
But taking the simple route sounded so much nicer.
Gonna make some rubber terminal caps.


Front shot above, that is the fire extinguisher bracket you can see in front of it.


Rear shot 1


Rear shot 2

Posted by Picasa

Cat Repair

Long time suspected i had cat issues...Had a few warm up cat CELs... Occasionally pop flames etc
And of recent i had a very bad bottom end.  Either i was thinking clutch, engine retarding big time or cat.
So i went with the easiest thing to check and that was the cat.


You can see a pic of the failed cat.
I am sourcing a new cat atm, 2.5" universal


Top help from my mate Mat, owe him a few bottles now ^_^


Battery move PC925 in a Z27ag

Finally after 4 years my big ass stock battery died...It’s a huge mfarker...Size of a 4wd battery I reckon.
It weighs in at 16kg and the one I replaced it with is an Odyssey PC925 weighing in at 11.4kg.
I picked this battery for no apparent reason. It is a rip off in Australia at 370AU.
But I picked it to try an experiment. I wanted to stick it under my seat.


And get some more room in my engine bay without losing room in the boot with a battery box.
I had some timber which my car amp was attached to. I pulled the amp out because I have no more sub @_@

Originally I was going to cut a tight square in the wood to slide the battery into it.


But to my surprise it sits perfectly on top of the wood and still has about 15mm gap between the terminal and the chair...
Best luck I had in awhile.
From memory the timber is simple 16mm MDF which I cut to size. It sits between the 4 chair mounting posts.
A tied down strap was my safety to guarantee no movements at all.


I used L brackets to hold the board in place to two of the opposing chair mounting points.
I have a ground cable which I drilled into the chassis I also ran a 2nd cable to the chassis ground point.
Apart from that I used some Super Cheap battery terminals and re used my amp cable to run to the cars positive terminal.
I am yet to put a kill switch in for the battery and tidy up the engine bay terminals.


Saturday, February 5, 2011

Home Brew Overfill Kit

I was fascinated to see this little item being sold for over $100AUD BFM Full Blast - Overfill Kit
I was curious what it did.  So after researching all i could find is that it allows you to put extra gearbox oil in and you don't need to un tighten the top filler bolt...Which most would know is a slut!
So i did some research and found out that the thread was a simple M18x1.5mm
Original plan was to buy a bolt matchin this and tap it out and thread an internal thread to a tapered valve i had.

But on the way back to work i saw enzed...And to my amaze ment they sell a bolt matching that thread that is already tapped out!!!! OMFG
So then i purchased a tapered 90 degree elbow to mount into the internet thread of the bolt :)
Enzed is a shop that sells hose and hose fittings.
I also purchased some teflon tape and some braided hose.


I need to buy some conduit to protect the hose.
I also bought a brass plug to plug the other end of the hose

According to a Jap post the guy puts 2lt of fluid.  I had to measure this as I couldn't get it to overfill past the 90 degree bend.  I put about 2.5lt haha and couldn't see it.
So best to measure :)

Updated Parts List:

PS: if you plan on changing oil regularly, would make a lot of sense to replace those hex bolts with normal M18x1.5 bolts. Which I am contemplating on doing, credit to Ayu452 for the sizing of the bolt. /home-brew-overfill-kit.html
Sales people got confused, apparently in providing the items i used. General names include:
1)
M18x1/4 BSP (which is a generic sensor adapter)
e.g. Brass adapter bush, suits threaded port in the turbo outlet pipe for Australian DTS, MTQ & Safari systems with threaded Metric M18 x 1.5.
2)
Barbed Brass Fitting - No P6 Male Elbow - 1/4 x 1/4 (Hose x BSPT)
Code: 06006-0404
 - used to create the right angle in the sensor adapter
3)
Barbed Brass Fitting - No P10 Female Tailpiece  - 1/4 x 1/4 (Hose x BSPT)
Code: 06010-0404
 - used to block the end of the open hose that runs into the engine bay
4)
1/4 BSP Taper plug
 - used to close the end of (3)

I use 6mm hose with hose clamps. The hose has an outer cover, with some electrical conduit. I didn't have any issues with heat, it was more so protection from rubbing or getting pinched.


Some info from Minkara see here:
In principle, by attaching the inlet, you can enter up to 3.4L (1.75L oil standard). If you go up the oil capacity, so I think that many of decline and deterioration can be suppressed as it increases the amount of oil temperature. Moreover, the mechanism is able to easily replace the oil, if you connect the accessory to a one-touch Koneta male connector on the bottom of the cap, oil Server (pump) can be injected from the comfort of your oil.

Thursday, February 3, 2011

Lauch of my Travel Blog!

I gave trying to maintain a single page on this blog about all my travels!
Fail!
So I made a new one ^_^ I hope it turns out ok
http://ayu452-adventures.blogspot.com/
Where did i start the blog? Finishing off my stupid holiday to vietnam...1 year later!
How can I catch up on my holz @_@
Still got taiwan to do and soon to be korean and japan
The first photo of all of us! Before we hit Vietnam! Shot in the temple lift doors ^_^

Friday, January 28, 2011

LSD Install Z27AG Part 2

Where to start...
Before i move on and talk about cracking the box open, I thought i put up some details on clutches I got from Rcolt.com forums.

Clutch Info:
From Mitsubishi
 - Friction pl8: 2301A085 (trade $249+gst)
 - Pressure Pl8: MN196047 (trade $307+gst)
 - Thrust bearing: 2960A042 (trade $172+gst)
    All up: $800.80 incl gst (retail is $920)

Extreme (Adelaide Clutch Services) 6 button sprung ceramic clutch kit
 - Pressure and Friction pl8 kit: KMI220015DSBHD $504.50 incl gst
 - Release Module: ATFM103 $282.28 incl gst


Htec Elite - Sachs OEM Replacement Unit - http://www.htecelite.com/
 - Sachs Pressure Plate - 3082 000 590
 - Another part number found on the box - 3000 951 043

Now down to business...
Various torque setting:
 - Top engine mount bolt and nuts = 43+/-4Nm
 - Starter motor = 24+/-3Nm
 - Bottom engine mount three bolts = 58+/-6Nm
 - bell housing bolts = 48+/-6Nm
 - bell housing bottom cover (bolt that go into the gearbox) = 23+/-4Nm
 - bell housing bottom cover (bolt that go into the engine block) = 48+/-6Nm
 - LSD ring gear bolts = 85+/-5Nm
 - 18 gearbox torx bolts =  = 27+/-1Nm


1) Gearbox should be successfully off the vehicle! Hardest bit is done! Now to crack the box open.  It is surrounded by numerous torx bits that will require you to use the female torx bits we bought.  I recommend doing it by hand, they aren't really tight.
You have to remove the throw arm from the clutch.  I think that just pulled off with a bit of muscle and un did a clip.
You don't want to run the risk of damaging the threads.  There are some more torx bits located inside the bell housing cover.  I labeled all the bolts to try and put them back in the holes they came out of. A little anal of me.  I think 18 of them, 6 inside.
Once all bolts are removed there are various pry point on the box.  Metal tabs where you can get a good grip with screwdrivers or pry bars...
DO NOT try to separate the box via the lip...You don't want to damage the lip causing the box not to seal properly.
Only use the pry points and rubber hammer.
It may take awhile to get the cover off due to the dowel being tight.  You can see the lower dowel on the bottom of the photo to the left.
2) Case is now separated, you can see the stock diff just sitting there.  Remove it and put it somewhere clean.

You can also remove the magnet and give it a clean.  My friend inspected the ring gear and other gears to look for any serious wear.  All checked out on my 70,000km box.
Next bits are fun :) I used a rattle gun to remove the bolts holding on the ring gear (18mm bolts).  They have loctite on them.


Removing the ring gear was simple enough.  Remove all the bolts then slowly hit the ring gear off with a rubber hammer.

To reinstall it, what i did was clean it REAL good with come carb cleaner.  You don't want many metal on it.
I then lined it up, it was a real tight fit so what I did was use the bolts to slowly pull it down.  Slowly tightening the bolts in a star pattern.  Once the ring was down i removed the bolts.  Cleaned the bolts and got rid of all the old loctite.  Put new loctite and installed them back. I tightened them with the rattle gun.  First toque setting.  I assume about 50nm.  We then put it in a vice and i held it while my mate torqued them ~90Nm.
It was extremely hard to hold and sharp.  Do where gloves, the ring gear is deadly!
3) Replacing the outer race that is pressed into the case.  Extremely painful process. I suggest you have an arsenal of flat head screw drivers, pry bars, flat hooks, 2 arm pullers etc.

Do it from both sides of the case, try to nudge it out little each side.  Be careful not to damage the axle seal otherwise you will have to replace this (as I did).  Will be posting that how to as well.
Presser the near bearing outer race by using the old one to tap it in.  Put some new gear box oil over the LSD and gear compents.
4) Clean the edge of the gearbox up very well.  Use some new gasket sealer to seal the box.  Do it on the inside of the bolts and dowel.  Put the case on slowly.  Tap it down over the dowel.  Do not wipe the gasket sealer off.  Let it ooze out. Lightly tighten the bolts till you see some sealer ooze out.  Let it sit before you torque the bolts to 27 Nm.

Before you stick it on the car put a bit of grease on the thrust bearing and inspect.
5) Now to get the gearbox back into the car.  Little bit of mucking around but a engine crane or a second pair of hands would really help.  I slid it under the car on the jack and a mate held it from the top
Once its sitting on the input shaft spline its not to bad...Then you gotta try get the top engine mount bolts to light up.
Installation is pretty much the opposite of reversal besides filling the gearbox.

I ran the old gearbox oil through it for a couple minutes while it was on stands.
Note you ABS lights may have a sad and come on.  I just done about 20km/hr for about 5 minutes on the stands.
Then dropped the oil and re-filled it with the good stuff.
You will have to drive down the road to remove the ABS lights (that what i did).

Wednesday, January 19, 2011

LSD Install Z27AG Part 1 - Getting the Box Out!

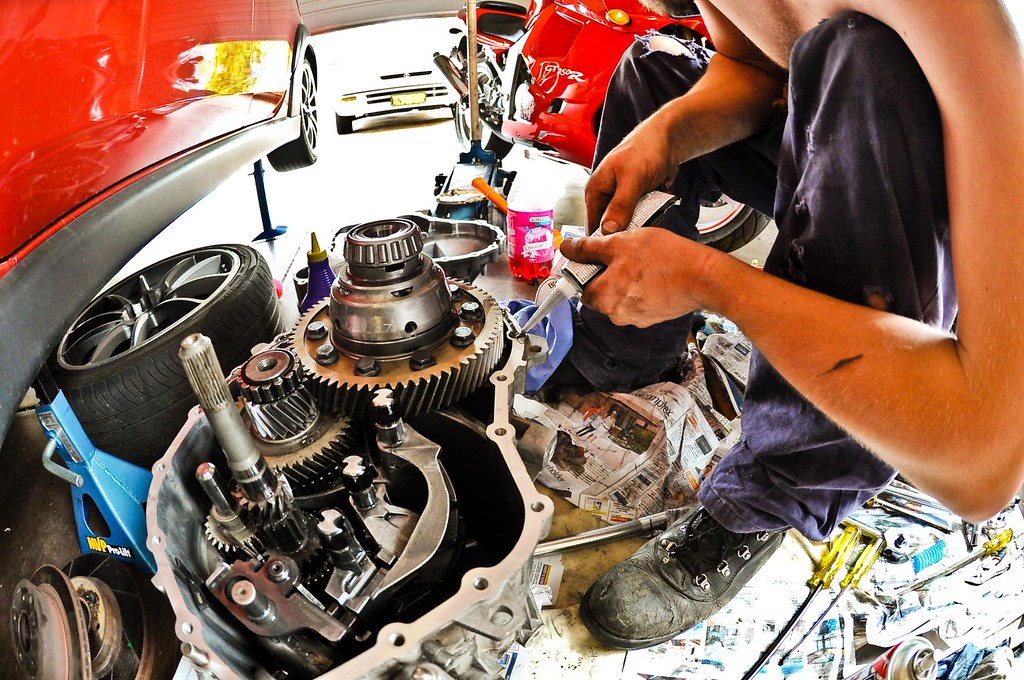
I was bored over christmas so i thought i hit up something big on the car...First thing that came to mind beside a forge internal rebuild was an LSD...
I have lots of problems trying to put down 300nm when going around a corner :D
I would of loved to do a turbo upgrade but the dyno time costs about $800 and I don't want to spend that much coin considering i just did it a couple months back.
I started my research in Japan.  I tried to track down all the info i can before i had the box split open in my garage and missing parts @_@

First part of business was the parts required
Worked out i needed
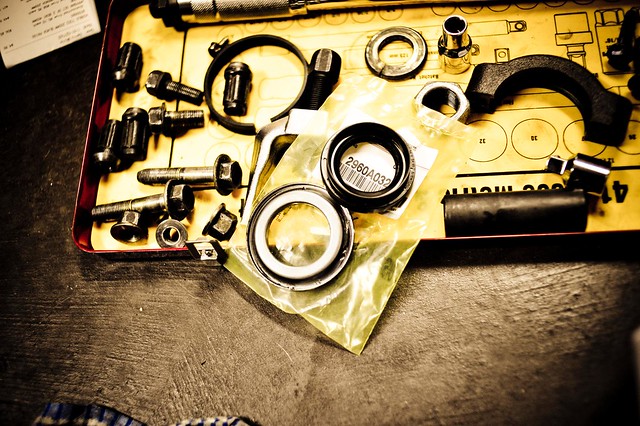
- the LSD and tapered roller bearings
- gearbox fluid GL4 75-90 (Quaife recommends standard gearbox oil, I managed to score Royal Purple)
- assorted pullers, tie rod separators, axle nut (32mm 6 sided socket - Impact!), female torx bits and assorted socket sets, spanners, geared spanners, hammers, crow bar, breaker bar, rattle gun, security bit set and torque wrench
- 2 jacks and 4 stands

I believe the female torx bit was a T12.  I bought a set of them (ABW).

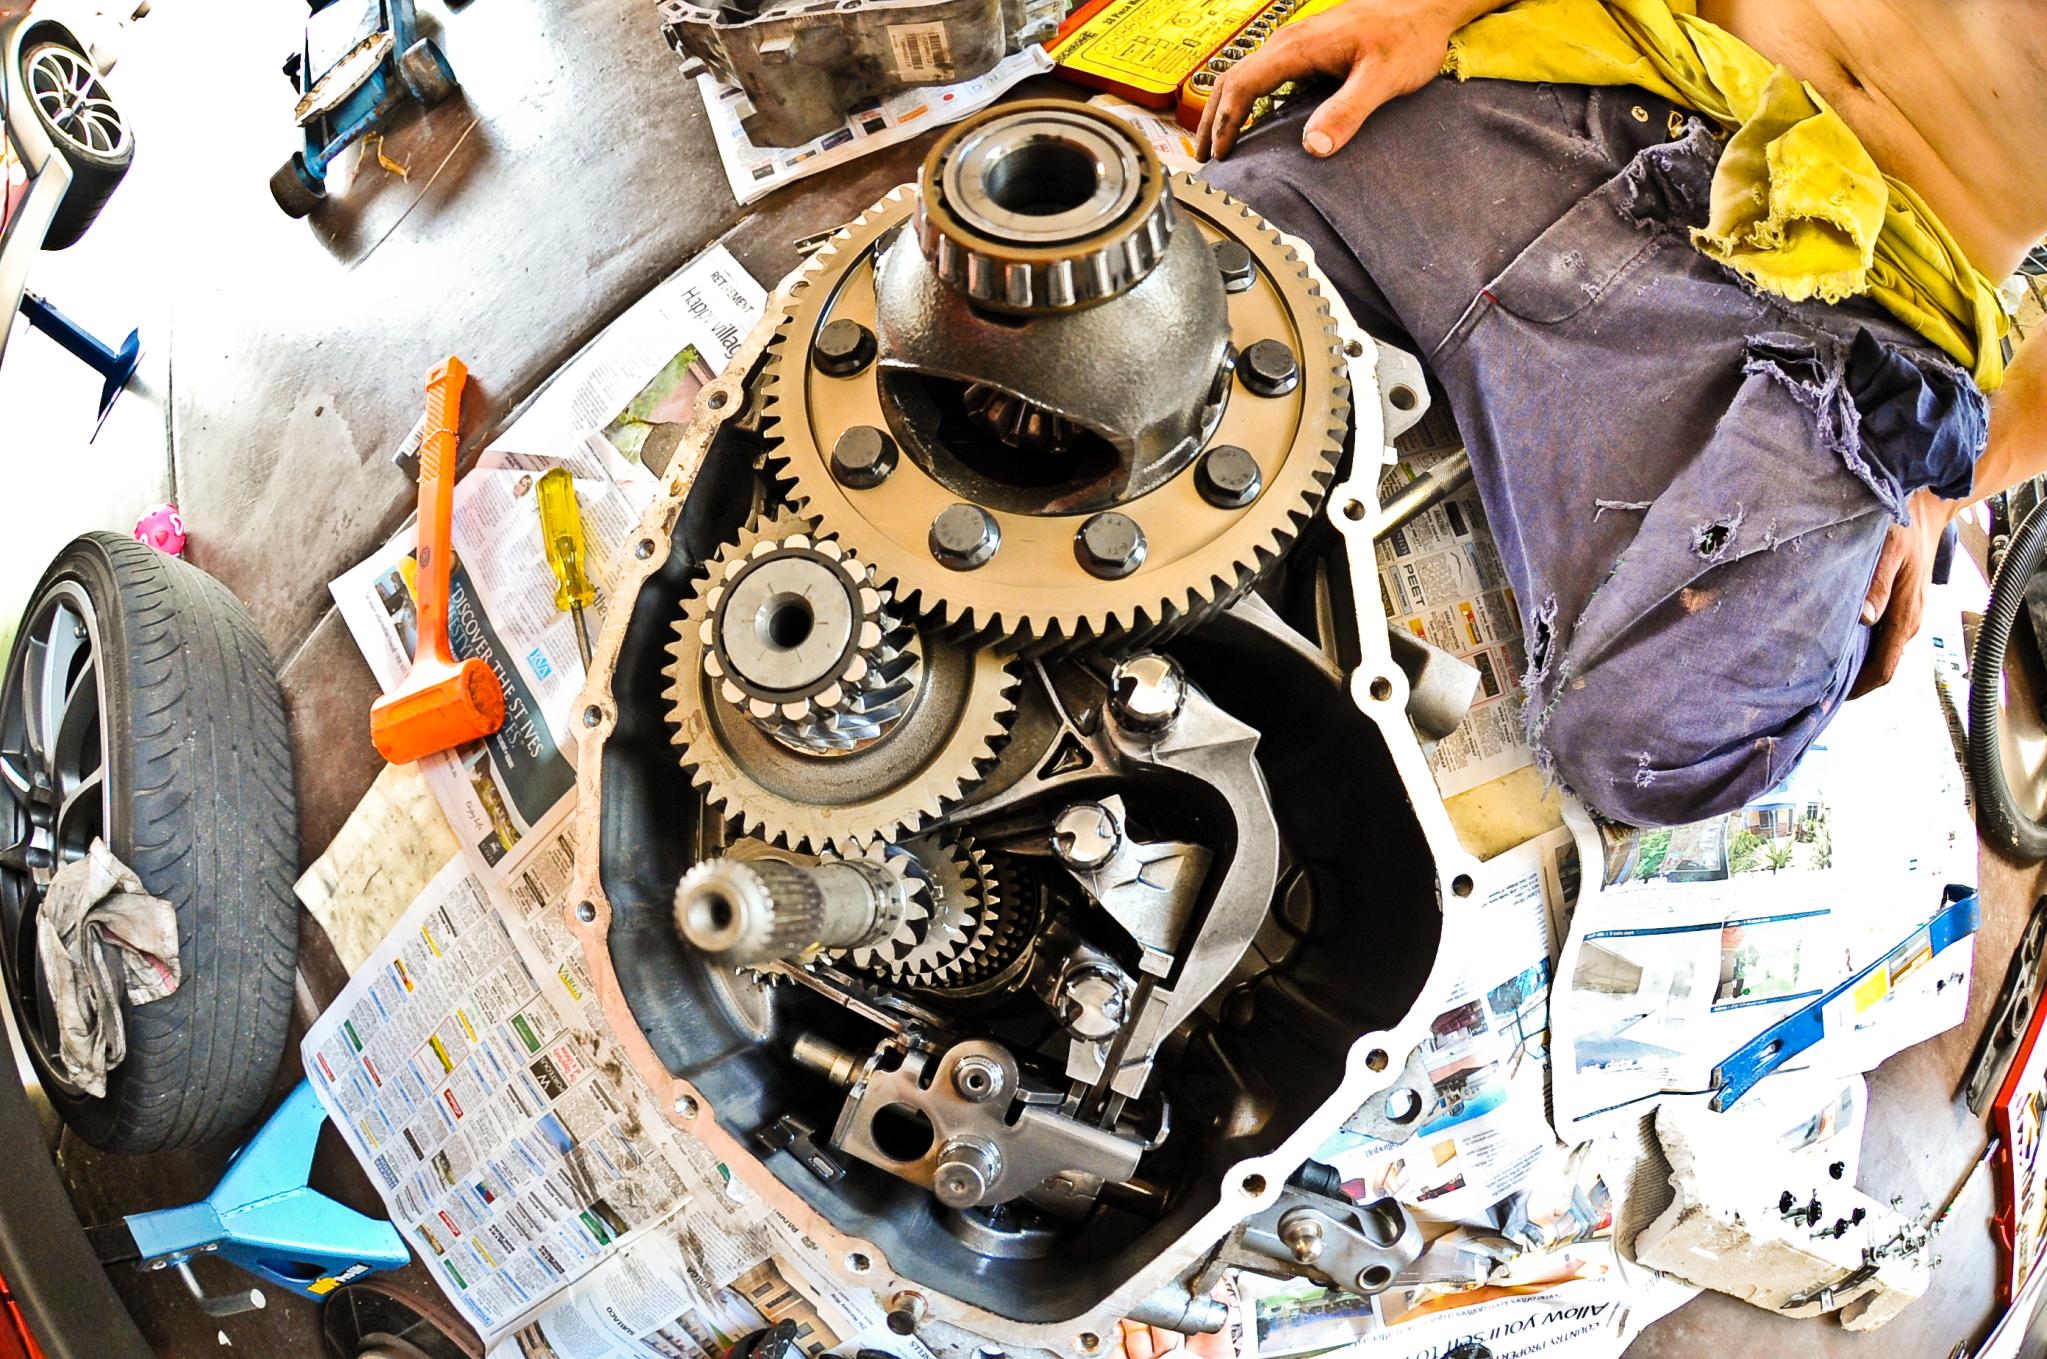
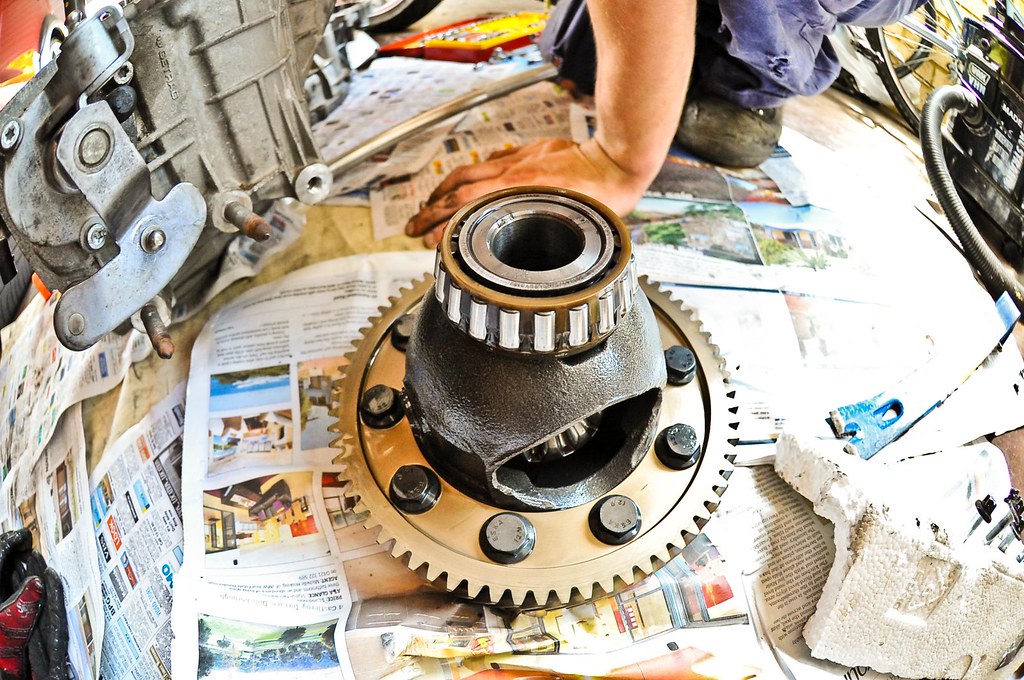
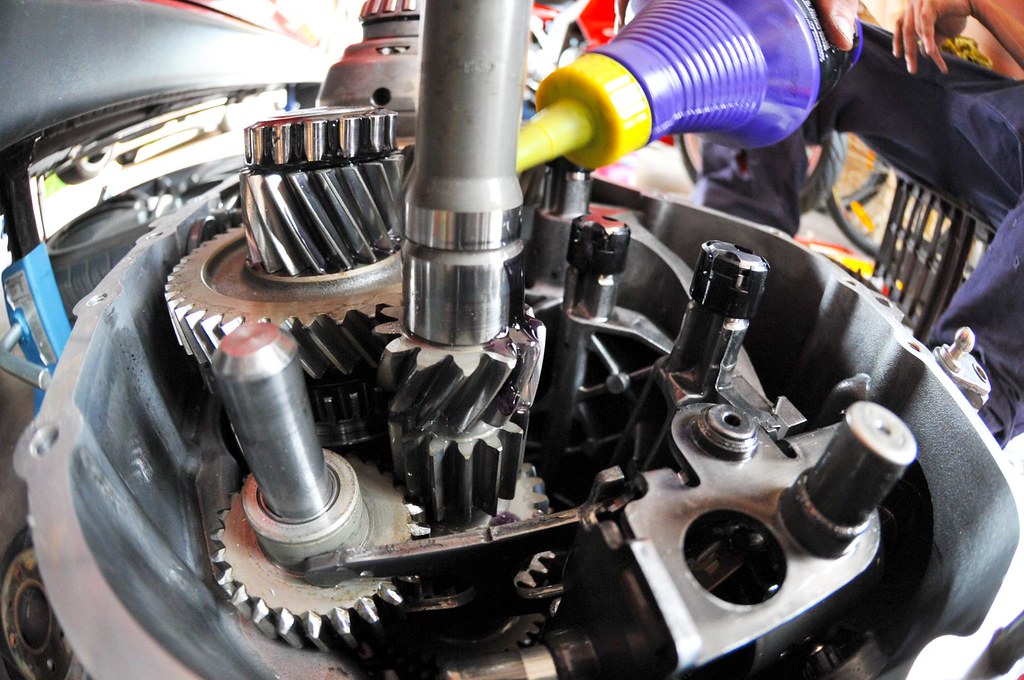
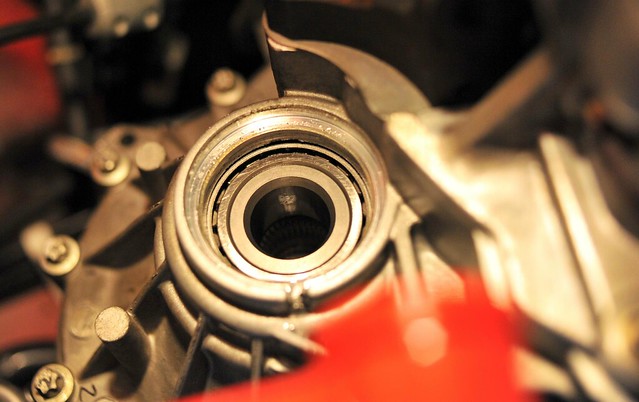
The LSD doesn't require shims or pretension settings. The bearing outer races are identical to the stockies and they are simply press fitted in.  Biggest slut ever to remove

Some part numbers of the Ralliart Items
- Bearings which is RA930740K1
- Ralliart Gear Oil SAE/75W-140 Parts No.RA75140G11

Below is the Ralliart Part Number for the LSD - Z27AG - Install Manual
RA250113S1 税込価格¥139,650 (¥133,000)
□ カム角度45°/15° 1.5WAY □ カムリング組替により、35°/15°
□ プレート10枚(フリクションディスク6枚、フリクションプレート4枚)
フロント機械式L.S.D.キット
COLT Ver-R M/T 適合

Never seen a gearbox internal...I found this little one of the Evo X DOG TYPE GEARBOX INTERNAL KIT RA250186N1 >>>

Cusco Part Numbers
LSD 440 C15 - Mitsubishi - Colt Ver. R - Z27AG - Front - 1&1.5 Way Model - 1.5 Way
LSD 440 F -Mitsubishi - Colt Ver. R - Z27AG - Front - 1 Way


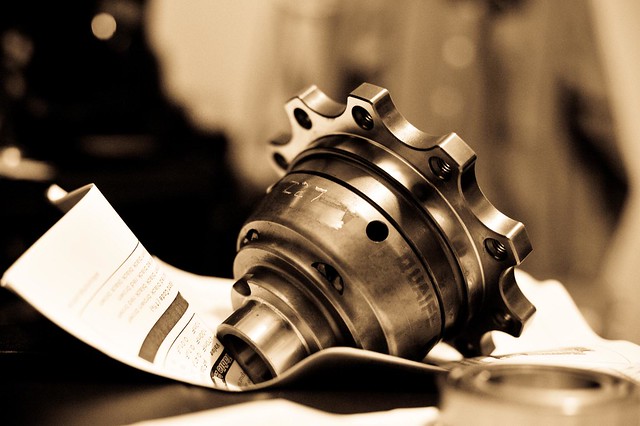
Why i went Quaife over the Cusco/Ralliart model?
Clutch style units require a special oil as well as much more regular oil changes and i got the Quaife at a really good price :)


Where do i start?


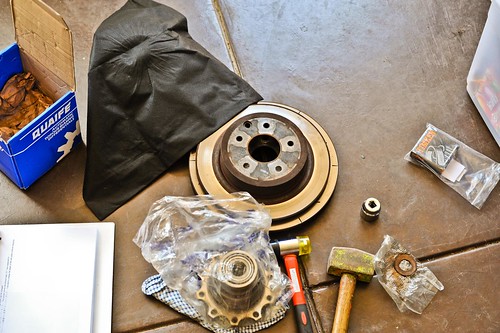
1) I started with something simple, pressing on the bearings on the LSD. I couldn't find a bearing press and someone willing to help so I attempted it the old fashion way. I found that some people prefer this way so you can control it better.

I used a 32mm socket on top of a 34-36mm washer (i think) to tap on the bearings.
Use a bigger socket it you have one 32mm was my biggest ;)
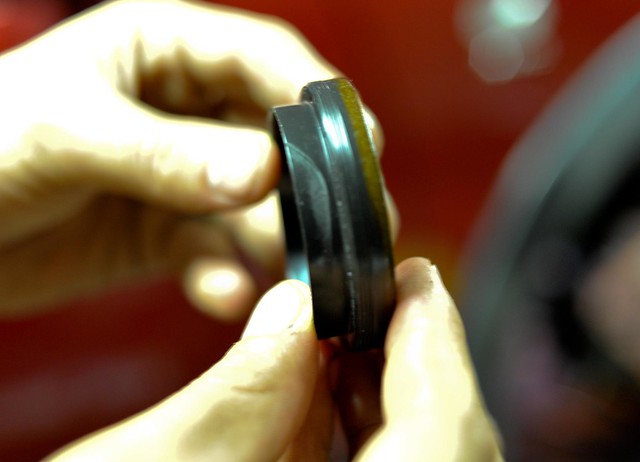
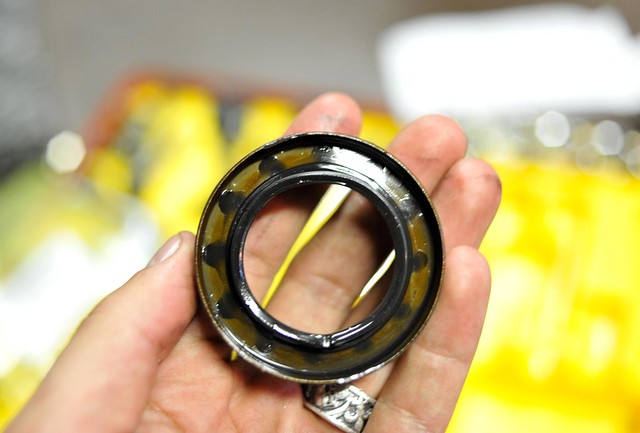
NOTE: bearing and outer race are matched! do not mix them up and mark them.
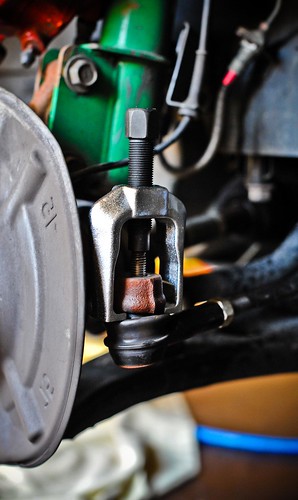
  2) Need to remove the axles from the gearbox. To do so you need to remove your rims, drop the gearbox oil, remove the axle nut (32mm) remove the tie rod from the hub and brakes.
You will also need to remove your brakes and rotors. Hang the caliper from the springs so no weight is on the brake lines.
To remove the tie rod a handy tool is a tie rod separator see right.
There are multiple types this is one of them.
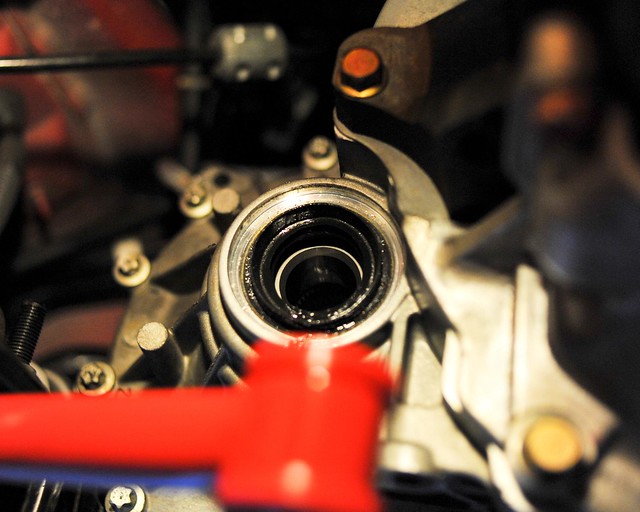
To remove the gearbox filler/drain plugs you need a hex bit 5/16 i believe was the size.
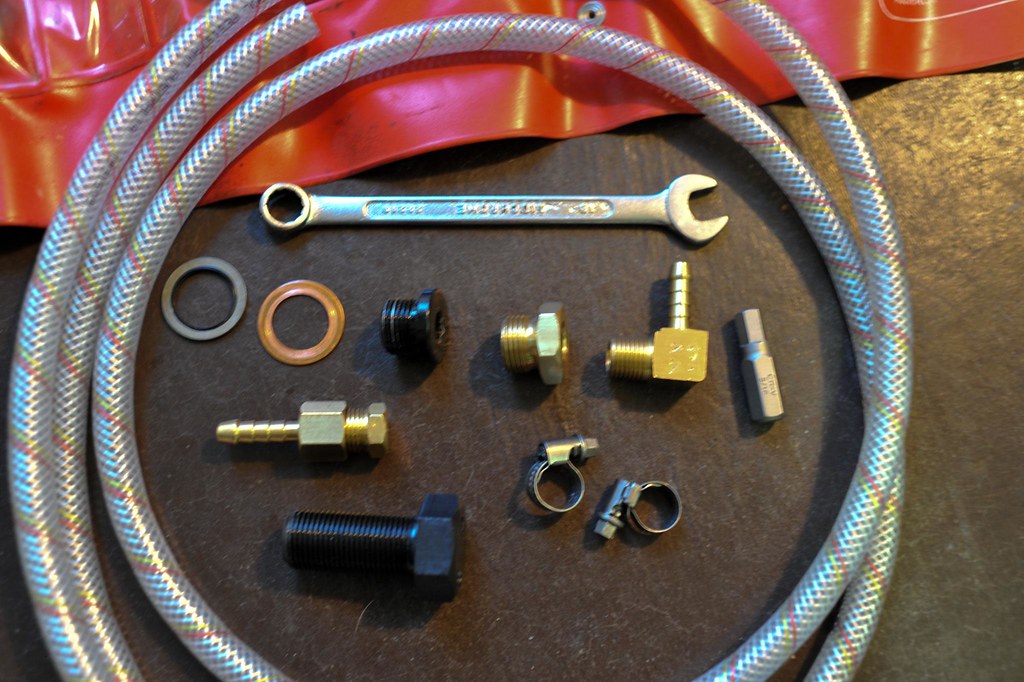
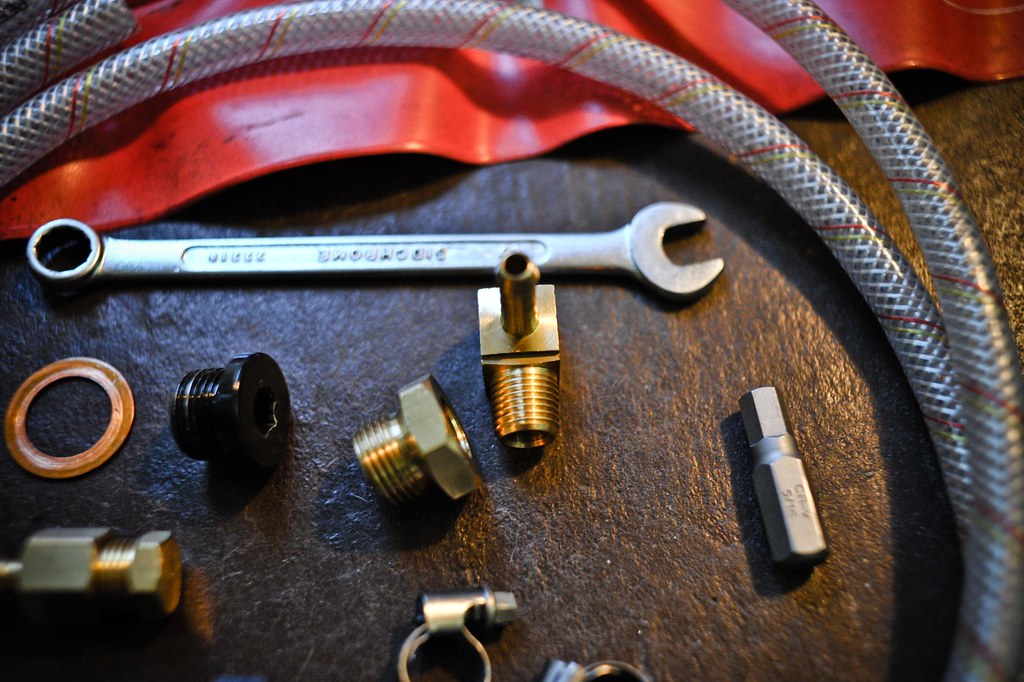
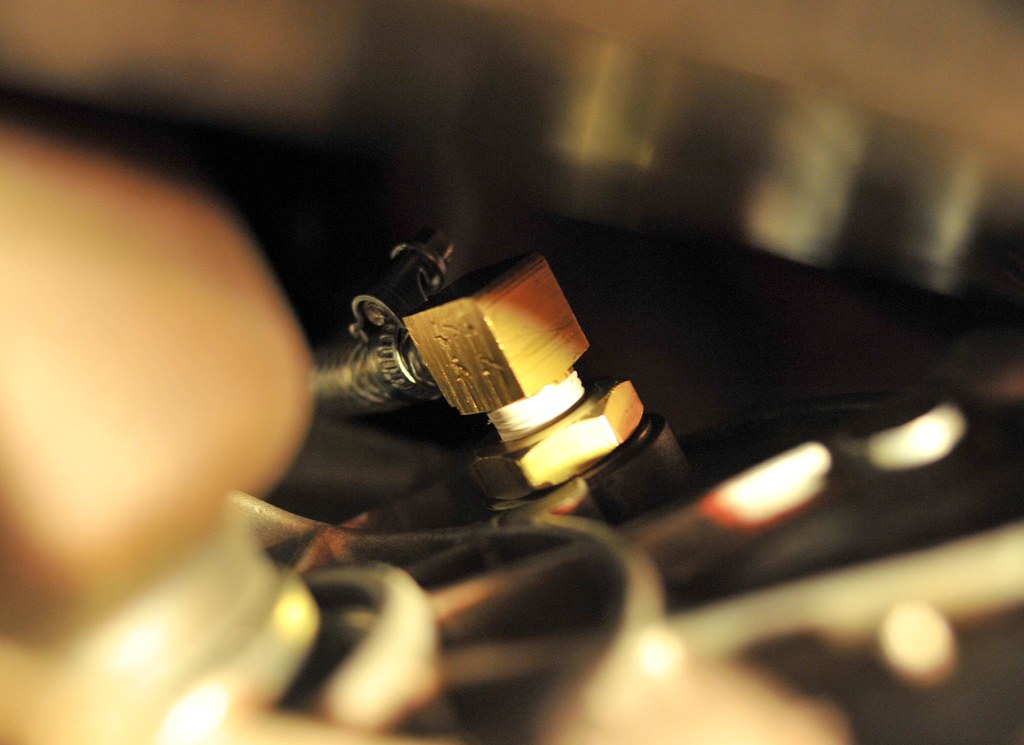
It is worth while buying a M18x1.5mm brass fitting for the filler hole with a right angle bit so you can fill it up from the top of the engine bay anytime (I have completed this side project).
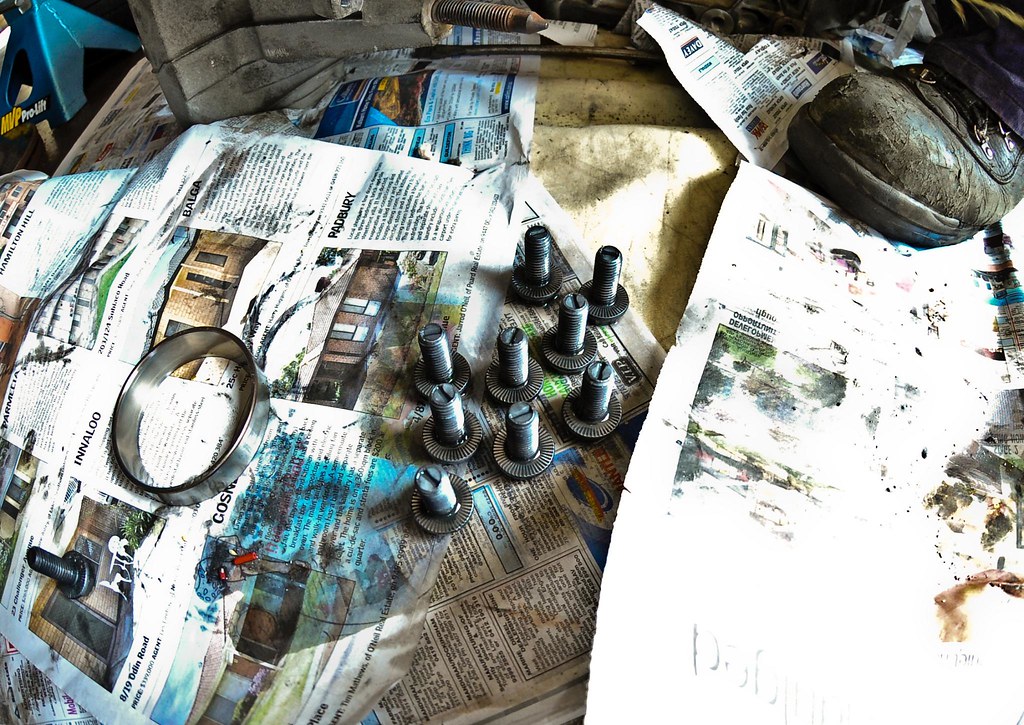
Then you remove your suspension to hub bolts (2 of them)...I marked all bolts, well tried to.


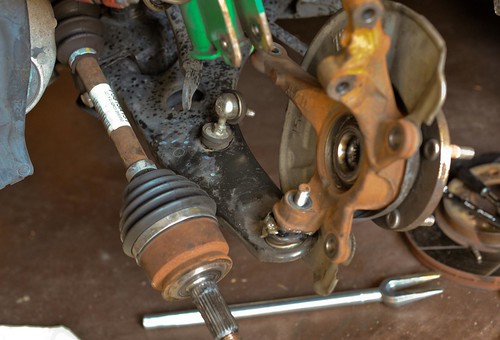
Once the hub is hanging freely you might have to smash the axle end to release it from the hub bearing.
Once it is released you can remove your hub assy or just leave it hanging.
Dont do what i need and get impatient and use a tierod splitter bar, you just break shit (fail @_@ )
If you want to remove the hub assy spray the lower ball joint with CRC then use the ball joint/tie rod separator.
I removed the stock sway bar bolt also.

3) Driver side axle should come out easily there is no circlip holding it in apart from a 2 bolt bracket.
I have a after market front pipe that was able to stay on the hole time.  The stock one might get in the way and may need to be removed.  The passenger side axle might be a bitch because it has an internal snapring/circlip...so you need to wedge something between the gearbox and the cv joint/bearing thing.
Try not to damage the inner axle oil seal when removing the axle...Do this by pulling it straight out slowly without hitting the sides.  Otherwise you have to replace it like I did. Which is fairly easy.

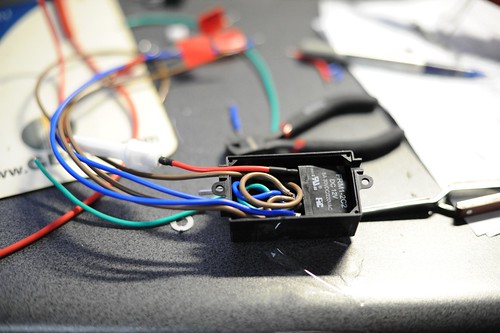
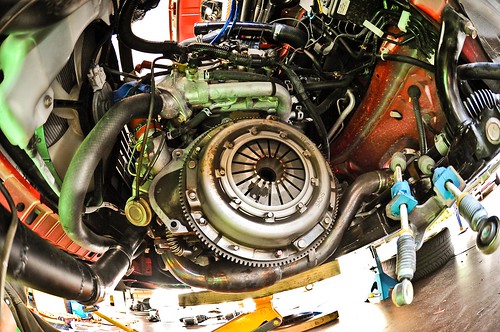
4) Other things you need to remove are battery, airbox, clutch master cylinder and starter motor.  Various bolts on all of them, nothing to special.  Also need to remove the clutch cover (that's what i call it, no idea the real name)
Those 4 red bolts and 2 others hold on the clutch cover thing (right).
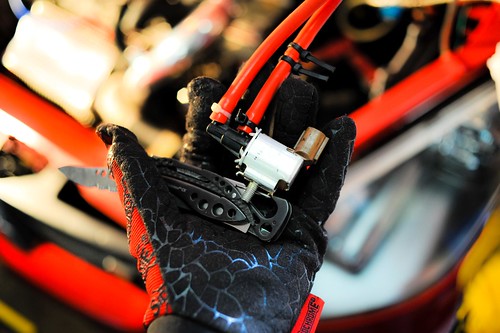
Remove the black thing is the clutch master and the other black thing is the starter (above right).

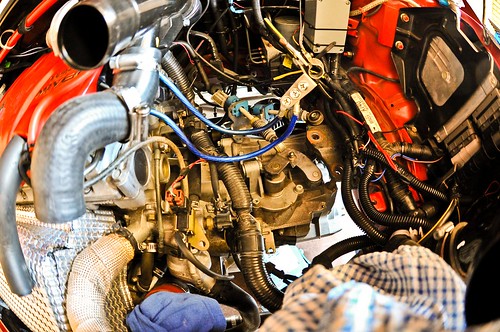
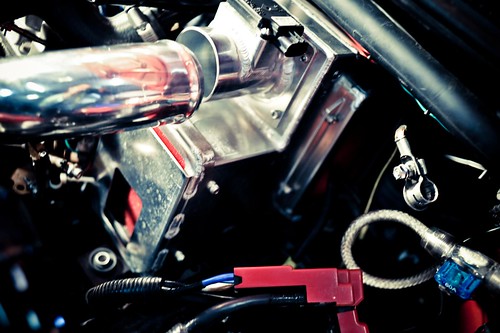
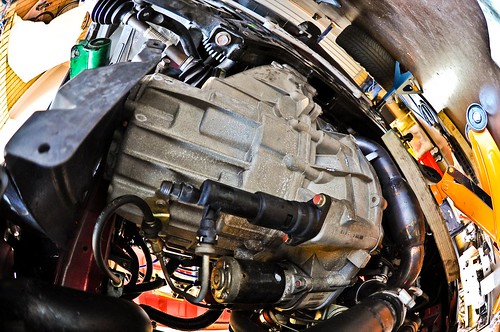
5) Remove all the stuff in the way of the gearbox top side.  I removed the battery tray and some of the intake pipes.  There are 3 engine mount bolts you need to take off.  Also another 5 bolts holding the gearbox to the engine.
Some are in stupid places a long extension and universal joints will help or a wobble bar. You still have to remove the gear linkages with a flat head screw driver will help to pop them off.  Try not to damage them.
best to remove the 5 gearbox screws before the engine mount bolts.  


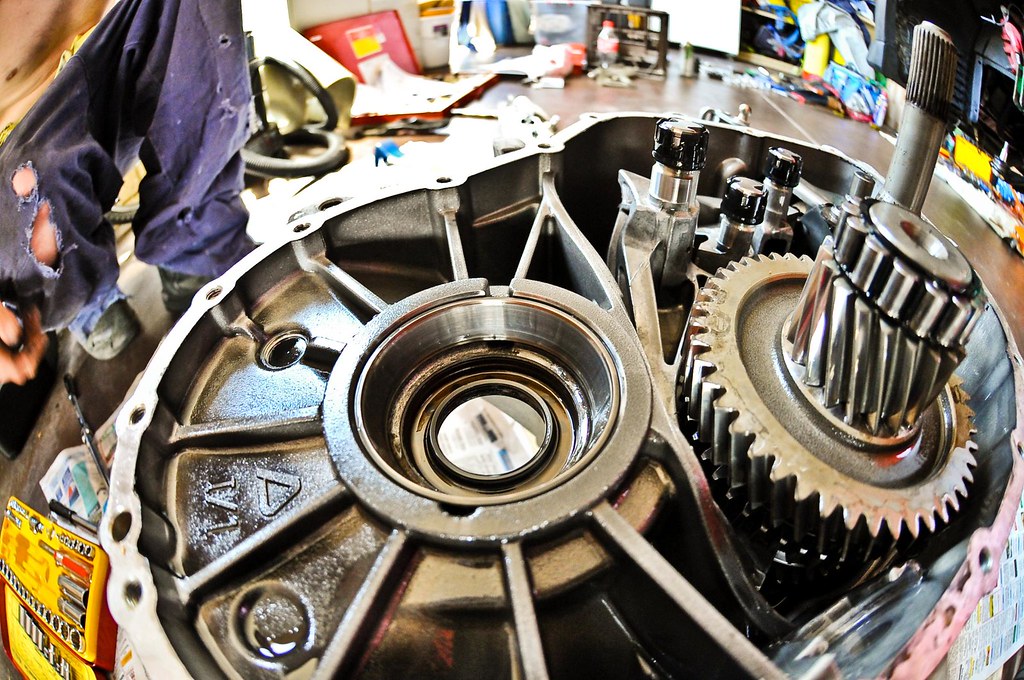
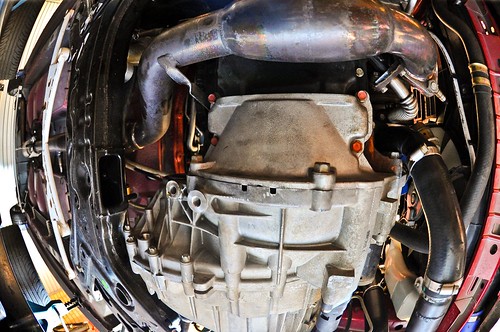
Don't worry it wont drop, it is sitting on the crankshaft spline. Now the gearbox should come free with some movement.  Try to break the seal on the bell housing.
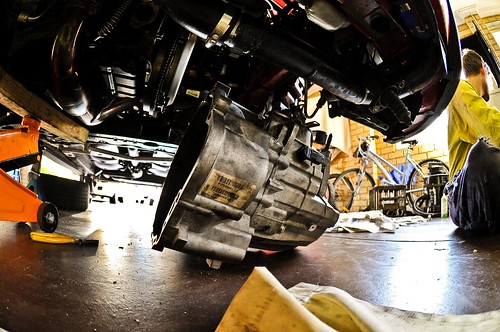
From now on things get tricky.  Dropping the gearbox off the spline @_@


We used two jacks to wiggle the engine up and down to get it to fall out.  Do get an extra set of hands!!!
So by lifting the engine up (use a piece of wood between the oil sump and jack for protection) and down you need to be able to clear the gearbox off the side intrusion bar/car frame?
Clutch cover and  front pipe (right)

Wednesday, December 8, 2010

One Tuff Z27AG

Finally after a couple years I pulled my finger out and went to a full ECU and Dyno tune...
I had been previously playing around with various mods to get more power out of the little 1.5lt Turbo.

I tried a special YR Advance Solenoid http://www.yr-advance.com/ this provided me with around ~1.1bar boost..Upped from stock ~0.9bar.
Very happy with this...then i got there exhaust...then the airbox...i love there stuff
Quality is top notch!

Changed to the airbox after the pod suffered from to much heat soak...it is a crazy price...dont know if it was worth it...but i went a lil crazy and got it.
I believe i can sell it at a later date. But its working nicely for now.
~$700AUD
Takes a bit of effort to install and remove...its so precise mounts nicely in the stock airbox position


The airbox uses a dual intake system. Ram air from the front and a 2ndary intake on the side...
Plan is to remove the battery and locate it at the back and run another cold air intake to the side...

I was a cheap ass and decided to install my own intercooler after I got ridiculous quotes. Put it in for about 250$ and half a days work.
It is from a Xr6 got it for $100.lots cheaper than the 2k Greedy version.  Cooler survived my 250HP tune

Went for the adaptronic ECU because nothing else was supported...Recently the ECU flash has been unlocked though.
http://adaptronic.com.au/
My friend installed it in his shed...was a good days work.
To complete the tune i upgrade the fuel system with fuel pump, reg and 525cc injectors.


To match the power i had upgraded the brakes and suspension.  Found a 2nd had set of Tien for small compact Z27ag (Ralliart Colt).

Another little experiment i tried was the Jarcar Boost controller...when on WOT I was able to hold ~1.1bar boost


I made a relay to switch between stock ecu boost and the jaycar boost depending on if i was WOT or
not.
Below is my tune...Happy with the power so far...Now i need an LSD which I am researching. Future mods may include a bigger turbo once i kill the stock one!


Saturday, December 4, 2010

SOLD

After many month trying to sell my lens i manage to sell both in 1 day!!!
Crazy.
Sold the 105 Macro and the 135 f2 DC...
DAM! wish i still had them but...mmmm now i got some extra cash flow for furniture when i buy a place!


Took a couple of photos b4 I sold the 105.
One of my fav close ups with the 105...I am still noob at the lens...dont have the steadiest hand


Took this photo...i thought it turned out so cute! a jumping spider no bigger than a couple of sand grains!