Wednesday, October 10, 2012

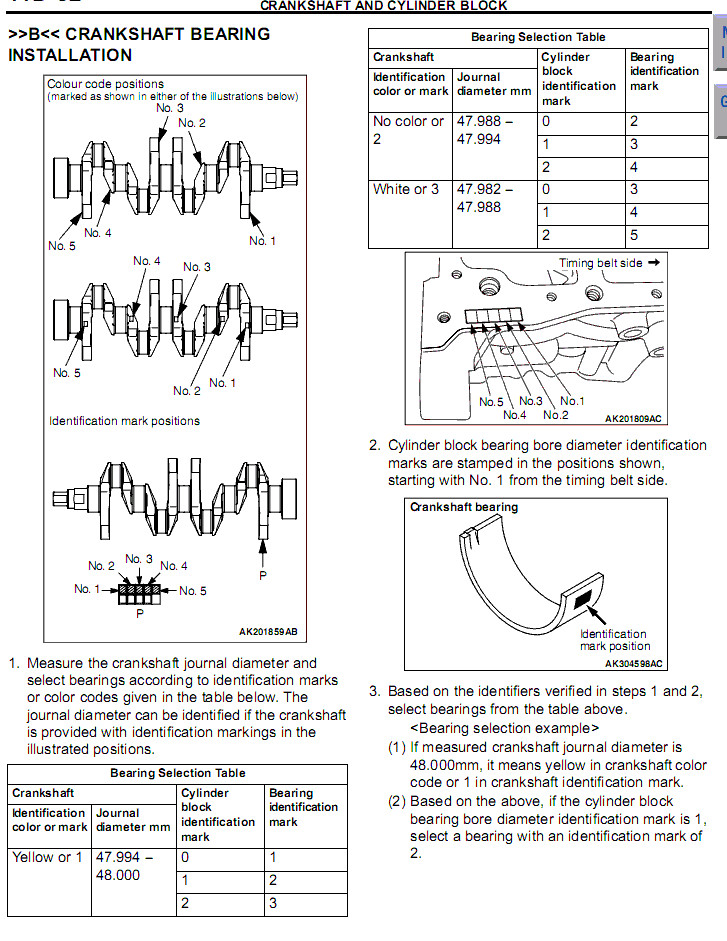
Selecting Bearing & Piston Sizes for a Z27AG RColt


Using the Russian catalogue i have been trying to work out what sizes i need. I am not able to measure the crank journals because the engine isn't with me.
http://www.megazip.ru/
I been using the engine block markings to work out the sizes

I couldn't find any bearing ID marks . It was marked with a D8C C


Cylinder bore mark and piston mark are both C.
Funny enough that the other bores are size B. The one that blew was size C.

Putting the block back together -
z27a-4g15-engine-re-assembly-torque.html


The bent rod story - bent-rod-z27ag-4g15-more-to-come.html

Rod is marked with a J near the bearing cap, in the middle of the rod is a I. The piston skirt is marked with a B. I am not sure what each marking represents as they aren't clearly marked in the workshop manual


Cranks markings:
<-Front of engine -
1 (timing belt),2, 3,4, 5 (rear main)
 22222 [i believe this is the crank main cap journals]
ABBB1 [connecting rod bearings, I believe the 1 is a marker or identifier]
Therefore piston 2 (my bent rod) is size B
 = 41.988mm - 41.994


Piston skirt marked with a B?


My friend wasn't able to find any cylinder block ID mark (I believe its on the underside) or a bearing ID.


Looks like the conrod bearings are used in a lancer - http://forum.lancer-club.ru/
How the GTO is shown - http://www.camskill.co.uk/

Tuesday, October 9, 2012

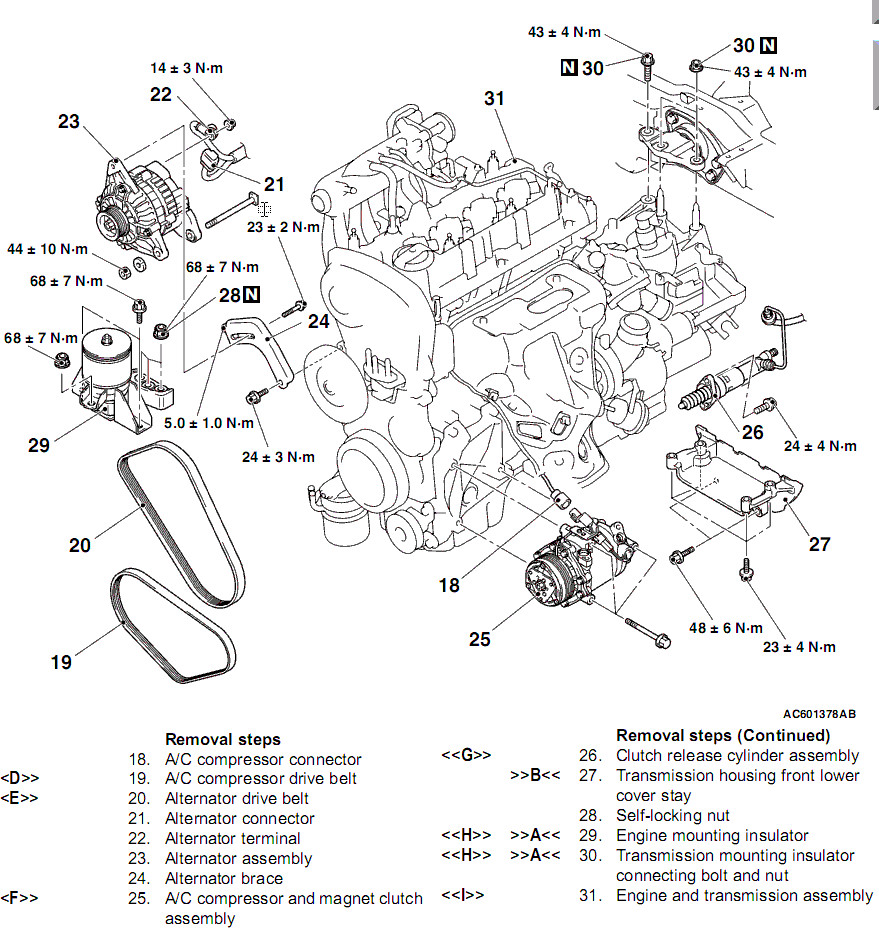
Z27A 4G15 Engine Re-assembly & Torque Specifications

The story so far
My friend bend a rod 'sad face'. The reason is hard to say. The bore has suffered some minor damage. We should be able to bore it out to 1mm over size. This is the maximum the stock head gasket can take. For now we are thinking of doing a simple hone as the rings seem to not go down that far in the bore to cause issue. http://ayu452.blogspot.com.au/2012/09/bent-rod-z27ag-4g15-more-to-come.html
Part of the rebuild is finding the parts which i have been doing - http://ayu452.blogspot.com.au/2012/09/rcolt-rebuild-pick-list-part-numbers.html
I am now looking at new rings and conrod bearings. We will reuse a piston from the wreck I have.
Below is a collection of data I am compiling for engine re-assembly.

Specs
ENGINE SPECS
Item                            Specification
Total displacement mL  1,468
Bore × Stroke mm       75.5 × 82.0 (DO NOTE PART OF THE COLT PDF NOTES BORE AS 75mm)
Compression ratio        9.0
Compression chamber   Pentroof
Camshaft arrangement   DOHC
Number of valve Intake 2
Exhaust                         2
Valve timing Intake opening  BTDC 34° − ATDC 6°
Intake closing                      ABDC 30° − ABDC 70°
Exhaust opening                  BBDC 50°
Exhaust closing                   ATDC 10°
Fuel system Electronically controlled multipoint fuel injection
Rocker arm - Roller type
Auto-lash adjuster - Equipped

The 4G15-MIVEC-T/C engine employed in the Colt is designed to provide higher performance and higher output by using a turbocharger to the 4G15-MIVEC engine employed in the conventional Colt.
The main changes in the conventional 4G15-MIVEC engine are as follows:
• Cylinder head gasket changed
• Oil jet added
• Strength improved in piston and piston pin

Item 4G15-MIVEC-T/C
Total displacement mL 1,468
Bore × Stroke mm 75 × 82.0
Compression ratio 9.0
Compression chamber Pentroof-type
Valve t iming Intake opening BTDC 34° − ATDC 6°
Intake closing ABDC 30° − ABDC 70°
Exhaust opening BBDC 50°
Exhaust closing ATDC 10°
Maximum output kW (PS)/rpm 113 (154)/6,000
Maximum torque N⋅m (kg⋅m)/rpm 210 (21.4)/3,500
Fuel system Electronically controlled multipoint fuel injection
Ignition system Electronic-controlled 4-coil


ROCKER ARMS AND CAMSHAFTS
                                             Std Val   Limit
Cam height mm Intake valves 35.08     34.58
Exhaust valves                       34.26     33.76

CYLINDER HEAD AND VALVES
                                                                 Std Val      Limit
Cylinder head gasket surface warp mm          0.03        0.2
Cylinder head gasket surface grinding limit
(including cylinder block grinding amount) mm  −           0.2
Cylinder head overall height mm            131.9  − 132.1   −
Valve margin mm - Intake valves                    1.0          0.5
                - Exhaust valves                             1.5          1.0
Valve length mm - Intake valves                 106.35    105.85
                - Exhaust valves                         106.85    106.35
Valve spring free height mm                          54.8        55.8
Valve spring squareness                            2° or less       4°
Valve stem-to-guide clearance mm
                - Intake valves                       0.02 − 0.05    0.10
                - Exhaust valves                     0.03 − 0.06    0.15
Valve guide length mm - Intake valves           48             −
                      - Exhaust valves                      55             −
Valve guide projection mm                     22.7 − 23.3      −
Valve face-to-seat contact width mm        0.9 − 1.3       −
Valve projection from valve spring
seat mm       - Intake valves                          48.8        49.3
              - Exhaust valves                             48.7        49.2

OIL PUMP AND OIL PAN
                                                                    Std Val    Limit
Oil pump tip clearance mm                        0.06 − 0.18     −
Oil pump side clearance mm                     0.10 − 0.18      −
Oil pump body clearance mm                  0.040 − 0.095   −


PISTONS AND CONNECTING RODS
Piston pin press-in load (at ambient temperature)
                                          N 4,900 − 14,700  −
Piston ring side clearance in ring
groove mm           - No. 1                 0.03 − 0.07    0.1
                            - No. 2                 0.02 − 0.06    0.1
Piston ring end gap mm
                    - No. 1                 0.15 − 0.30    0.8
                    - No. 2                 0.30 − 0.45    0.8
                    - Oil ring              0.20 − 0.50    1.0
Connecting rod big end thrust clearance mm  0.10 − 0.25    0.4
Oil clearance at crankshaft pins mm             0.025 − 0.040  0.1

CRANKSHAFT AND CYLINDER BLOCK
Crankshaft end play mm                            0.05 − 0.18    0.25
Oil clearance at crankshaft journals mm     0.02 − 0.04     0.1
Cylinder block gasket surface warp mm           0.05         0.1
Cylinder block gasket surface grinding limit
(including cylinder head grinding amount) mm     −            0.2
Cylinder bore diameter mm                      75.50 − 75.53   −
Taper of cylinder mm                              0.01 or less        −
Cylinder-to-piston clearance mm              0.02 − 0.04      −

TORQUE - Nm
ALTERNATOR AND IGNITION SYSTEM
Oil level gauge guide bolt.........................24 ± 4
Water pump pulley bolts............................9.0 ± 2.0
Crankshaft bolts...................................181
Alternator brace bolt (alternator side)............22.5 ± 2.5
Alternator brace bolt (tightened with water pump)..24 ± 3
Alternator nut ....................................44 ± 10
Adjusting bolt.....................................5.0 ± 1.0
Ignition coil bolts ...............................10 ± 2
Spark plug ........................................25 ± 5
Cam position sensor bolt ..........................8.8 ± 1.0
Cam position sensor support bolts .................14 ± 1

TIMING BELT
Timing belt cover bolts................11 ± 1
Rocker cover bolts.....................5.0 ± 1.0 → 7.0 ± 1.0
Plug cap...............................21 ± 3
Tensioner pulley bolt .................48 ± 6
Tensioner arm bolt.....................48 ± 6
Auto-tensioner bolts ..................23 ± 3
Idler pulley bolt .....................44 ± 10
Crank angle sensor bolts ..............9.8 ± 2.0
V.V.T. sprocket bolt ..................55 ± 5
Camshaft sprocket bolt ................88 ± 10
Engine support bracket bolts, nut .....36 ± 6

FUEL AND EMISSION PARTS
Throttle body bolts ...................13 ± 2
Solenoid valve bolts ..................9.0 ± 1.0
Purge valve bolts......................5.0 ± 1.0
Delivery pipe and injector bolts.......12 ± 1
Fuel pressure regulator bolts..........12 ± 1
Vacuum pipe bolts......................9.0 ± 1.0
Solenoid valve nut.....................5.0 ± 1.0

WATER PUMP AND WATER HOSE
Engine coolant temperature sensor......29 ± 10
Water inlet fitting bolts..............22 ± 4
Water pipe bolts (M6)..................10 ± 2
Water pipe bolt s(M8)..................13 ± 2
Water inlet pipe bolts.................13 ± 2
Water pump bolts.......................14 ± 1

INLET MANIFOLD
Inlet manifold stay bolts (M8).........18 ± 2
Inlet manifold stay bolts (M10)........31 ± 3
Inlet manifold bolts and nuts..........18 ± 2
Engine hanger bolt.....................19 ± 3

EXHAUST MANIFOLD
Oxygen sensor..........................50 ± 10
Turbocharger cover bolts...............10 ± 2
Oil return pipe bolts .................10 ± 2
Exhaust fitting bracket bolts .........35 ± 6
Exhaust fitting bolts .................59 ± 5
Turbocharger bracket bolts (turbocharger side)....59 ± 5
Turbocharger bracket bolts (cylinder block side)..35 ± 6
Oil pipe bolt (flange bolt) ...........10 ± 2
Oil pipe bolt (eye bolt) ..............17 ± 2
Turbocharger bolts, nuts ..............59 ± 5
Water pipe bolt (eye bolt) ............31 ± 2
Water pipe bolt (flange bolt) .........10 ± 2
Exhaust manifold nuts (M8) ............29 ± 3
Exhaust manifold nuts (M10) ...........49 ± 5
Thermostat housing hanger bolt ........24 ± 4
Engine hanger bolt ....................19 ± 3

ROCKER ARMS AND CAMSHAFT
Oil feeder control valve bolt............11 ± 1
Oil pipe eye-bolt (cylinder block side)..30 ± 3
Oil pipe eye-bolt (cylinder head side)...42 ± 2
Cam position sensing cylinder bolt.......22 ± 4
Front bearing cap bolt...................21 ± 2
Rear bearing cap bolts...................21 ± 2
Bearing cap bolts........................11 ± 1

CYLINDER HEAD AND VALVES
Cylinder head bolts 49 → 0 → 20 → +90° +90°

OIL PUMP AND OIL PAN
Oil cooler bolt............27 ± 2
Oil pressure switch........10 ± 2
Drain plug ................39 ± 5
Oil pan bolts .............7.0 ± 1.0
Transmission stay bolts ...23 ± 4
Oil screen bolts ..........19 ± 3
Baffle plate bolts ........10 ± 2
Relief plug ...............44 ± 5
Oil pump case bolts .......14 ± 1

PISTONS AND CONNECTING RODS
Connecting rod cap nuts...........17 ± 2 → +90° to 94°

CRANKSHAFT AND CYLINDER BLOCK
Flywheel bolts..................132 ± 5
Rear plate bolts................10 ± 2
Oil seal case bolts.............11 ± 1
Bearing cap bolts...............34 ± 2 → +30° to 34°
Detonation sensor bolts 20 ± 1
Oil pump cover bolts 10 ± 2

Sealants
Camshaft position sensor support...Mitsubishi Genuine Part No. 970389
Rocker cover.......................Mitsubishi Genuine Part No. 970389
Engine coolant temperature sensor..3M Nut Locking Part No.4171 or equivalent
Cylinder head (camshaft bearing cap fitting section).....3M ATD No.8660 or equivalent
Oil pan............................Mitsubishi Genuine Part No. 970389
Oil pump case......................Mitsubishi Genuine Part No. 970389
Oil pressure switch................3M ATD No.8660 or equivalent
Rear oil seal case.................Mitsubishi Genuine Part No. 970389

FORM-IN-PLACE GASKET (FIPG)
This engine has several areas where the form-in-place gasket (FIPG) is used for sealing. To ensure that the FIPG fully serves its purpose, it is necessary to observe some precautions when apply-ing it.
Bead size, continuity and location are of paramount importance. Too thin a bead could cause leaks. Too thick a bead, on the other hand, could be squeezed out of location, causing blocking or narrowing of fluid passages. To prevent leaks or blocking of passages, therefore, it is absolutely necessary to apply the FIPG evenly without a break, while observing the
correct bead size.
FIPG hardens as it reacts with the moisture in the atmospheric air, and it is usually used for sealing metallic flange areas.

Disassembly
Parts sealed with a FIPG can be easily removed without need for the use of a special method. In some cases, however, the FIPG in joints may have to be broken by tapping parts with a mallet or similar tool.

Surface Preparation
Thoroughly remove all substances deposited on the FIPG application surface, using a gasket scraper. Make sure that the FIPG application surface is flat and smooth. Also make sure that the surface is free from oils, greases and foreign substances. Do not fail to remove old FIPG that may remain in the fastener fitting holes.

FIPG Application
Applied FIPG bead should be of the specified size and free of any break. FIPG can be wiped away unless it has completely hardened. Install the mating parts in position while the FIPG is still wet (in less than 15 minutes after application). Do not allow FIPG to spread beyond the sealing areas during installa-tion. Avoid operating the engine or letting oils or
water come in contact with the sealed area before a time sufficient for FIPG to harden (approximately one hour) has passed. FIPG application method may vary from location to location. Follow the instruction for each particular case described later in this man-ual.

Assembly
HEAD ASSEMBLY
• Assemble to the cylinder block so the cylinder head gasket identification mark of "1.5" is at the top surface and on the inlet side.

1) When reusing a cylinder head bolt, check that its nominal length (shank length) is not greater than the limit. If the limit is exceeded, replace the bolt.
Limit: 103.2 mm
- Measured from under the head of the bolt
2) Apply engine oil to the threads and washer of the bolt.
3) Tighten the bolts to 49 ± 2 N⋅m in the indicated sequence.
4) Loosen all the bolts completely.
5) Tighten the bolts again to a torque of 20 ± 2 N⋅m in the indicated sequence.

<-INSTALL - Timing Belt [engine front]
     8 6 1 3 9
    10 4 2 5 7
*NOTE: Remove is opposite, therefore:

<-REMOVAL - Timing Belt [engine front]
     3 5 10 8 2
     1 7  9 6 4

• If the tightening angle is smaller than 90°, proper fastening performance could not be assured. Be sure to respect that angle.
• If the bolt is tightened to an angle greater than the specified angle, loosen the bolt com-pletely and then retighten it beginning with the first step.
6) Make paint marks on each boltís head and on the cylinder head.
7) Turn the bolts 90° in the tightening direction and in the indicated sequence.
8) Give another 90° turn in the tightening direction to each bolt, making sure that the paint mark on the bolt head and that on the cylinder head are on the same line.

INSPECTION - CYLINDER HEAD
The thickness of the metal that can be removed by grinding from both the cylinder head and the mating cylinder block is limited to 0.2 mm in total.
Gasket surface warp
     Standard value: 0.03 mm or less  -   Limit: 0.2 mm
Grinding limit: 0.2 mm
Cylinder head height (standard value for new part): 131.9 − 132.1 mm

Replace the valve if the length is less than the limit.
Standard values: Intake 106.35 mm  -  Exhaust 106.85 mm
Limits:          Intake 105.85 mm  -  Exhaust 106.35 mm


Monday, October 8, 2012

LS400/UCF20 or LS430/UCF30 or Sumitomo Front Brake Upgrade to Z27AG Rcolt


<- pads on the left top and bottom are the 4pot ones


Requirements:
- Custom dog bones from FullBlast or DiY
- GTO Rotors
- Pads
- Brakelines?
- 16" rim min (UCF20)


Note sure min rim size for a UCF30, but i believe the 16" is fine


-------------------------------- Lexus Info

http://www.lexls.com/info/lsgenerations.html

First Generation - LS400 = UCF10/11
Series I: 1990 - 1992
Series II: 1993 - 1994

Second Generation - LS400 = UCF20/21
Series III: 1995 - 1997
Series IV: 1998 - 2000

Third Generation - LS430 = UCF30/31
Series I: 2001 - 2003
Series II: 2004 - 2006

Fourth Generation - LS460/LS460L = UCF40/41
Series I: 2007 - Unknown

-------------------------------- FullBlast Kit

http://www.bfm-fullblast.ecnet.jp/products/colt/brakikit.html

Φ315 × ○ rotor for Mitsubishi GTO two
mono-block caliper for ○ × Toyota UCF30 two
piece caliper bracket × 2 ○
○ class two short parts, brake pads ×
accepted by ○ wheel mounted at 16 inches

- Celsior/LS400 UCF20 4-pot alloy calipers
- LS430 brakes are the big monoblock alloy calipers used in the Night Pager UCF30 Celsior Caliper Kit

-------------------------------- GTO Disc Information

PRODUCT MODEL (Mitsubishi GTO/3000GT Z15A, Z16A With 313mm Discs )
- Mitsubishi GTO/3000GT With 313mm Brake Discs Fitted

Size
Diameter - 313mm
Height - 45mm
Brake Disc Type - Vented
Thickness - 30mm
Minimal Thickness - 28.4mm
Number Of Holes - 5

Manufacturers Part Numbers for REF ONLY
BRAKEKIT032
Discs = MR235802 MB235803 MB928897
Pads = MR389516

BFM Fullblast RColt - Minkara UCF30 Kit - Z27AG 
YR Advance RColt - Minkara Blog

-------------------------------- 

Subcategory : Mitsubishi
Application : 3000GT GTO 3.0 V6 Twin Turbo Z16A 313mm Disc 8/92>99
Product Code : KBD660G
Quick Code : D4567
Details : Vented discs. A = 313, B = 30, C = 28.4, D = 45, E = 69, F = 5.

-------------------------------- DBA Disc Comparison

Part No - Ventilation - Diameter - Height - Thick - Min Thick - CB - Studs - Shipping Weight kg
DBA 4402 - Vented      - 276        - 45       - 24    - 22.4      - 69 - 4     - 6     * Evo III
DBA 4213 - Vented      - 296        - 45.2    - 30    - 28.4      - 69 - 5     - 7     * Evo IV RS CN9A
DBA 4216 - Vented      - 314        - 45.5    - 30    - 28.4      - 69 - 5     - 8.6  * GTO -
DBA 4425 - Vented      - 276        - 45       - 24    - 22.4      - 69 - 5     - 6

I am currently using the DBA 4402 - z27ag-evo-twin-pot-pads-n-rotors-p2.html
More info here - project-mu-or-carbotech-276mm-or-294mm.html

-------------------------------- 4Pot Sumitomo from a Nissan

I have just realised using the 314mm rotor for the GTO you can combo it with the S15 Sumitomo 4pot brakes. I believe they are stock on a 280mm rotor. Minimum i would run is the 296mm
These similar 4pots are found on R32 and alike http://www.sxoc.com/
It looks like there are a few types. Some are aluminium and some are iron.
A few japanese guys run this combo, see here - http://minkara.carview.co.jp/
I have yet to figure out what dog bones they run. Because he runs spacers he also uses KYO-EI Long Hub Bolt SMB2. I believe i will use H&R hubcentric spacers, as i trust these.  I will see what i need at a later date to clear a possible future brake upgrade.

R32 GTR runs the 296mm rotor. A perfect match.
V-Spec runs a much bigger rotor, I believe with Brembos.
Z32 brakes are common upgrade items due to the lightweight aluminium.

I bought hub centric rings OD=73mm / ID=67.1mm. I believe our CB is 67.1mm.
I should really confirm this (well the Volvo S40 is 67.1mm). But i run a rotor of 69mm. Could be the reason its not entirely a super snug fit :)

-------------------------------- H&R Hubcentric Trak+ Spacers  - CB = 67.1mm 
This CB seems to be shared between Mitsubishi, Volvo and Hyundai according to H&R.

10646715        Volvo S40
wheel number of holes 4, wheel spacer DRS-System 10 mm 114, 3/4, 67, 1 mm note 18, offset: +15 | Notes:  18

30646715        Volvo S40
wheel number of holes 4, wheel spacer DRS-System 30 mm 114, 3/4, 67, 1 mm, offset: +15

40646715        Volvo S40
wheel number of holes 4, wheel spacer DRS-System 40 mm 114, 3/4, 67, 1 mm, offset: +15

5064671         Volvo S40
wheel number of holes 4, wheel spacer DRM-System 50 mm 114, 3/4, 67, 1 mm, offset: +15

http://www.h-r.com/includes/download.php?file=../bin/42TG0651.pdf

-------------------------------- Disc Size based on GTO/3000GT Year Model
Please reference DBA P# above.

3000 GT
JF 10/1992-5/1994
 - 213 - 4213
3000 GT 5/1994-on
 - 216 - 4216

3000 GT, GT-SL, GT-VR4
GT & GT-SL 4/1990-1995
 - 425 - 4425
GT-VR4 1990-5/1993
 - 213 - 4213
GT-VR4 6/1993-1999
 - 216 - 4216
                                                           Image: Compare LS400 discs

-------------------------------- Lexus Rotors?

DBA Part Numbers for LS400/UCF (NOTE: Couldn't find any reference for these @_@)
Standard Vented Rotors (Front) - DBA745 (Special Order)
Slotted Vented Rotors (Front) - DBA745SL (Left Hand) & DBA745SR (Right Hand)

RDA
Lexus LS400 2.0L 94-2000 Front Disc Brake Rotors RDA7517- 7517SL/SR


Rotor Type: Vented
Diameter: 314mm x 28mm
No of Bolt Holes: 5


Celsior UCF20/21 Brakes fit JZX90/100
Front brakes:
UCF10/11 rotor : 276 x 28
UCF20/21 rotor : 315 x 28 - JZX Install


-------------------------------- Lexus UCF30 better than the UCF20?
UCF30/31 are lighter, monoblock all aluminum vs the jza80 calipers where only the outer half is aluminum.. but the UCF caliper mounting holes are atop the caliper whereas the jza80 caliper attaches the conventional way
UCF20/21 Calipers are basically the same as JZA80 4 Pots. Slightly narrower and a bit heavier, but also a lot cheaper.
I know to fit them to a JZX90/100 you not only need the special offset nuts for the mounting holes, but also Roll Centre Adjusters.
JZA80 1996–2002 Twin Turbo Supra Front & Rear Brakes - Planet Soarer Information

Some info from the Supra guys:

I installed the front brake of LEXUS LS430(Japan name "CELSIOR").

This caliper has light excellent strength for the mono-block 4 pots structure of aluminum.
Brake rotor is JZA80 324mm.

A rear brake was replaced with another thing at the same time, too.

The rear caliper of NISSAN SKYLINE GT-R (BNR32) was installed.
This caliper is excellent because it is a confrontation-type 2 pots though it is small.
Brake rotor is JZA80 in the same way.


This brake installation kit is on market to Japan.
The cost which I spent on this brake was about 250000 yen in total.
Of course it is the brake of front and rear. It was very powerful and moreover these brakes were excellent iin a balance of front and rear.

My JZA70 is equipped with ABS. Therefore installation was difficult, and needed time. Installation could be done beautifully. ABS works no problem too.

An installation photograph is at my Web site. As for the details, see this.

----
Takeshi Onishi
'91 TT 1JZ-GTE Japan
http://www.master-t.jp/


-------------------------------- Mounting Information
TBC


Sunday, October 7, 2012

GTR V-Spec Active LSD & A-LSD - Where to begin Part III

------- V-Spec Manual -------
Various confusing quotes i have gathered:

#Nissan Manual that comes with the car, it recommends at the back that the oils for both Vspec and Mspec cars, and stock gtr34s all use api GL5 oil 80w90 nothing special

#A GL5 75w-90 or 80w-90 is ideal for most of the diffs, we sometimes recommend certain LS oils as they are very good in any diff.

#The V-Spec diff needs a SAE90 LS oil according to my data.

#You don't need a 75w-140 in any of the standard diffs, only in certain aftermarket ones.

#LSD oil e.g Castrol LSX90

#Fill on the diff itself like the gearbox - LSD diff oil
#Fill through reservoir - ATF for the active LSD

------- Active LSD ------- Source - Skyline Australia - by user PM-R33
Why this sticky about the A-LSD?

The problem with this has been that there is little technical information on the Active-Limited Slip Differential (A-LSD) even though it is now over a decade later since they were made. There is information about however the information is scattered all over SAU over a dozen threads. The purpose of this sticky is to have all the information in one place to save people time searching all over the place for hours on end.

What is an A-LSD?
For people's information reading this that aren't aware of what an A-LSD is, it's a rare factory option on certain model R33 GTSTs of having a R33 GTR V-Spec diff. The diff is controlled via an ECU in the boot next to the HICAS ECU. The ECU triggers a hydraulic pump that pumps a hydraulic fluid into the diff to lock it up when required. It does this by observing the behaviour of the wheels and when it detects that one wheel has broken traction it will send power to the other wheel to compensate and keep maximum traction. So in theory it is ment to behave like an open wheeled diff all the time and behave like a locked diff when needed. In theory this is great however it doesn't always go according to plan.

The problem is the response time. When a wheel starts losing traction the diff should instantly recognise it and go into action instantly without you even noticing. This would give perfect traction. The thing is this doesn't happen. The single wheel will break loose and in certain situations the diff will take ages to send power to the other wheel - sometimes not at all. This causes very unpredictable "tank slaps" when trying to go straight or when trying to slide.

How do I know if I have an A-LSD?
The way to spot whether a vehicle has an A-LSD is as follows:
#Cooling fins on the diff itself (and a large hydraulic line going to it)
#Hydraulic pumps and wiring underneath back rear of vehicle
#Hydraluic fluid resevoir in boot on right hand side
#Two ECU's next to battery in the boot (one is HICAS, the other ALSD)
#A-LSD and SLIP wording inside tacho on dash
#Resevoir in Boot
The resevoir in the boot holds the hydraulic fluid required by the A-LSD. The original Nissan fluid is called Matic D however it is expensive and hard to get. Instead Castrol Transmax Z can be used due to it being an equivalent fluid.

#A-LSD Fluid
The diff itself has "USE LSD OIL ONLY" stamped onto it so something like Castrol LSX90, Motul LSD oil or similar shall be fine. Some people have used non LSD oil it the diffs however I would do what Nissan says.

The following thread showed the main discussions about what fluid to use.
http://www.skylinesaustralia.com/forums/Re...=active+lsd+oil

Next we shall go into the problems that arrise with the tricky A-LSD.
Aftermarket ECU Problems
The first problem that arrises with the A-LSD is aftermarket ECU’s are not made with it in mind. This causes the A-LSD to go into instant failure mode as soon as the factory ECU is removed and something aftermarket is put into its place. The A-LSD light on the dash will illuminate to indicate a failure. Luckily this is a fairly simple fix but took a long time to find by some of the people here on SAU.

The following thread shows how to overcome this problem. Basically a TPS signal needs to be rewired to go the the A-LSD ECU in the boot.

http://www.skylinesaustralia.com/forums/Ec...Ls-t107656.html
Thanks go out to T04GTR, Moanie and PaulR33 for this.

Diff Lock Problems - Bleeding
So now going onto the main problems with the diff, the delay. One main reason that adds to the delay is air being trapped in the lines that the hydraulic fluid flows through. This air needs to be bled - just like in brake lines.

On page 3, PaulR33 wrote a bleeding method for the diff.

http://www.skylinesaustralia.com/forums/Re...d+oil&st=40

The main thing is to use the bleed nipple on the top of the diff, which most people never knew about and the bleed nipple near the pumps.

Diff Lock Problems - Full Control with Aftermarket ECU
Here is my DIY write up on how to get full control of the A-LSD with an aftermarket ECU. This means that you can setup the diff to function the way you want and have it locking up when you choose.

http://www.skylinesa...ftermarket-ecu/

Once again, great thanks to everyone involved in those threads, especially PaulR33 for all his hard work and posts regarding the A-LSD. Hopefully this sticky can continue to be a good information source regarding the A-LSD.

Cheers

Phil

-------  Attessa Bleeding How To Example #1 -------
NOTE: You need Nissan ATF fluid for this application. Check step "4" first so you can have everything ready to go.

Step 1: Fill tank 30mm above MAX line. "tank is located in right rear of your trunk"

Step 2: Open air bleeder on oil pump. Crack open till there is no more air coming out and you get fluid dripping. "This air bleeder is located on the pump on top of the rear diff. Bleeder is on right side. Can’t miss it"

Step 3: After you tighten up that bleeder you go and turn the ign on. Don’t start the car just turn the key to ign.

Step 4: You need to unclip the air bleeder connector. " This is a white clip located under the dash on the right side behind your kick panel" Opposite side of your ECU" Might be a good idea to un screw your kick panel before you do any of these steps. When this connector is unplugged it puts the pump in (air bleeder mode) and the pump operates at a fixed hydro pressure to the transfer actuator"

Step 5: You now need to bleed the nipple on the rear of the trans just below the tail shaft and above the hydro line attached to the rear of the trans. You want to give it 1-second blerps. You can hear the pump actuate while doing this. Do this step until there is no more air coming out the nipple.

Step 6: Go back to the tank in the trunk to check the level of fluid. Fill to MAX is necessary or just above. Now to finish the bleeding process you need to go back into the car to the air bleeder connector. You want to plug it back in and then UN plug it and plug it back in. You want to repeat this process until the lower level fluid in the tank in your trunk has a 5mm max air gap between the lower and higher level fluid. I had to plug in and unplug my bleeder sensor about 20 times at least. If you want get a friend to check the rear level while you sit in the car unplugging the bleeder sensor that might be easier. I had to do this on my own

If this doesn’t make any sense let me know and I can retype it for you guys  I’ve done a search on this info this week and also about a year ago on this forum and never came up with anything conclusive so now we got it.

This is the tank in your trunk. I didnt get any before pictures but this gives you an idea of the high and low level's of fluid and how it should look when your finished.

This is the bleeder on the pump above the diff. Its on the right side of the diff. Very easy to spot:

This is the bleeder on the trans. I used a clear hose so I could watch the air shoot out.

This is the air bleeder connector. The fsm tells you to make a switch but it is easy to plug in and un plug many times.

-------  Attessa Bleeding How To  Example #2 -------

WHAT YOU'LL NEED:
10mm Ring Spanner
A Piece of clear hose measuring about a foot long and an internal diameter of about 6mm.
About 3-4 litres of Automatic Transmission Fluid/Dexron III (You can use the original Nissan Fluid, but it's damn expensive)
A Funnel.
Bucket or drip tray.

How to:
If your talented enough you can probably do it on your own but i would reccomend having two people. One to open the bleed valve under the car and one to keep refilling to bottle in the boot.

Now onto the process
1. Drive the car up on ramps. Or jack it up and put it up on jack stands.

2. Lay down some card board if you dont have a creeper.

3. Inside the boot on the drivers side is a removable panel. Behind this panel is the bottle of fluid. This is where you will refill it from.

4. In the drivers side foot well. On the right hand side, there is a kick panel. After removing this you will find a lot of wires and only one plug. A white plug with a Yellow Wire with Green Stripes coming in and out of it. This is the "Air bleed connector". You must unplug this.

5. Going under the car from the front, slide towards the back of the car till you come to the back of the gearbox. At the back of the gearbox and the transfer case, just where the tailshaft begins, you will see a hose coming from the back of the car. This pipe runs to the ATTESSA Pump. Just above this hose is the Bleed nipple. This should have a little black cap on it.

6. Turn the ignition on. Don't start the car just turn the ignition on.

7. Now you need one person at the back of the car with the funnel in the top of the bottle. And one person under the car. The person under the car must put the ring spanner on the bleed nipple, then place the piece of clear tubing over the nipple. Now with the other end of the tubing, put it in the bucket.
Crack (Undo a little) the bleed nipple. Now the pump recognises a pressure drop and starts the pump intermittently. Only run the pump for around a 30 seconds to minute at a time. Tighten up the bleed nipple and the pump will stop.
Keep doing this procedure till the fluid coming out of the clear tubing turns pink. (Or what ever color fluid you are pouring in.)

8. After all this, tighten up the bleed valve, put the cap back on the bottle, plug the wire back in, put all the trim back and away you go.

** bleed nipple on the ATESSA pump itself, which should be used to bleed the pump first. It's a bit hard to see, but it's on the bottom of the pump and can be accessed from the drivers side of the diff just above the RH drive shaft.

Finish
ENJOY
If anyone should find fault in this write up, please notify me and i shall make the adjustments. As i had no manual or anything to go by this is just my way of doing it. And all from just interpreting a mixture of other peoples ideas and explanations

-------  GTR V-Spec Short Description -------

The GT/GF-BNR34 (R34) Skyline GT-R and GT-R V-spec models were released in January 1999. The R34 GT-R was also made to be shorter (from front to rear), and the front overhang was reduced. The valve covers were also painted glossy red, rather than dull black.

A new feature on the R34 GT-R is a 5.8" LCD multifunction display on the center of the dashboard, which shows seven different live readings of engine and vehicle statistics such as turbocharger pressure (1.2 bar max), oil and water temperature, among others. The GT-R V-spec model added two extra features to the display: intake and exhaust gas temperatures. Nismo Multi-function Displays (MFD) can be bought at an extra cost, they include a lap timer, G-Force meter and an increase in boost pressure measurement to 2 bar. The R34 GT-R was made shorter in response to customer concerns who thought the R33 was too bulky.

Like the R33, the new R34 GT-R V-Spec (Victory Specification) models come equipped with the ATTESA E-TS Pro system and an Active LSD at the rear, while standard GT-R models come with the non-Pro system and a conventional mechanical differential. The V-spec model also had firmer suspension and lower ground clearance, thanks to front and side splitters, as well as a rear carbon fiber air diffuser, designed to keep air flowing smoothly under the car.

Another special model of the R34 GT-R is the M-spec. It was similar to the V-spec, but had special "Ripple control" dampers, revised suspension set up, stiffer rear sway bar and a leather interior with heated front seats. The 'M' on the M-Spec stood for Mizuno who is the chief engineer of Nissan.
At the time of the R34's release, like the R32 and R33, Nissan released an R34 N1 model. The R34 GT-R N1 was equipped similar to the R32 and R33 N1 models -- a homologation special. It was sold without air conditioning, audio equipment, rear wiper, or trunk lining, but ABS remained. The new R34 N1 was also given the new R34 N1 engine. Only 45 R34 V-spec N1 models were produced from the factory, 12 of which were used by Nismo for Super Taikyu racing. The rest were sold to various customers, mostly racing teams and tuning garages.


-------  GTR V-Spec Series Breakdown------- http://sportscarforums.com/sitemap/t-3810.html

R32 V-Spec (Victory Spec)
* Four-pot Brembos with 324 mm discs front and two pot Brembos with 300mm discs rear.
* Retuned ATTESA E-TS 4 wheel drive system.
* Bigger 17" x 8" aluminium BBS alloy wheels with 225/50 ZR 17 tyres.
* Revised front suspension to accomodate the larger wheels/tyres.
* Curb weight increased by 20kg because of these modifications.

R32 V-Spec II
* Tyre size revised to 245/45 ZR17 due to N1 endurance (Gr.N) race regulations.

R33 V-Spec
* ATTESA E-TS PRO can redirect up to 50% of the torque to the front wheels within 1/1000th of a second.
* Active LSD system splits the torque between the rear wheels.
* Even harder, and 10mm lower, suspension.
* Expedia S-07 tyres. Bridgestone Potenza tyres are fitted to UK spec cars.

R34 V-Spec
* Underbody diffusers front and rear
* ATTESA E-TS PRO
* Active LSD

R34 V-Spec II
* updated ATTESA E-TS PRO and E-LSD
* carbon fiber hood

R34 V-Spec & V-Spec II N1
Special equipment

* Twin ball bearing metal turbo-chargers
* Extra large, air-cooled engine oil cooler

Equipment deleted from the GT-R V-Spec II

* Rear intermittent wiper
* Rear fog lamp
* Remote control entry system
* Passenger's seat vanity mirror
* Clean air filter
* AM/FM electronic radio and CD player (equipped with aerial and wiring loom.)
* Glove box damper & glove box lamp
* Super-fine hard coat paint.

Equipment changes to GT-R V-Spec II

* UV cutting insulation and front door green glass to just thin glass
* Side indicator lamp to a reflector
* Color coded electric folding door mirror is painted black
* Leather hand brake lever to lightweight resin
* Leather centre console lid to lightweight resin
* Full auto air conditioner to a heater with outside temperature display

R34 M-Spec (Mizuno Spec, for Kazutoshi Mizuno)
* Nissans new "Ripple Control" suspension
* Minor interior differences
* Special Gold and Green color options
* Basically a smoother riding V-Spec, nothing else changed

R34 Nur Versions
* Color options from M-Spec
* Some suspension and engine pieces from N1
* The last of the mass produced GT-Rs, the last ever being the Nismo Z-tune

Basically, it breaks down like this. You have the GT-R. The V-Spec models have a little harder suspensions, bigger breaks, and so forth. Just a slightly higher performing GT-R. The V-Spec II models were just slight updates to the standard V-Spec versions, nothing major. The N1 models are the track ready versions, with very stiff suspensions, quicker responding turbos, lighter materials, and so forth. The M-Spec just had a new Kazutoshi Mizuno designed suspension system. But, it was just a V-Spec II at heart, so its just a V-Spec II with a smoother suspension and some minor trim and color options. The Nur versions were a little mix of suspensions pieces from the N1 and some trim options from the M-Spec. A nice mix of track ready and good looking. They were the last GT-Rs built.
Skyline07

Friday, October 5, 2012

R34 GTR V-Spec & Oils - Where to begin Part II

--- Read below for overwhelming information OR ---
Find out what I used here /r34-gtr-service-vspec-all-fuilds.html and here /my-oil-order-for-bnr34-victory-spec-r34.html

Do note:
 - I have confirmed that the A-LSD in the rear does require an LSD Oil
 - The gearbox does take an ATF Fluid
 - I used OEM for the transfer box
 - Front diff was a standard gearbox oil e.g. GL5 75W-90 / 80W-90

--- Introduction ---
Long story short. A friend has entrusted his R34 GTR V-Spec to me.
To me all cars are the same. Motors all operate under the same principles.
But the GTR is a different breed of animal. It has a few more parts that my typical FWD does not.

Scrolling through forums and technical articles I begin to understand the workings of the GTR and the Vspec.
The GTR is different from the standard R34 due to the Getrag gear box. Which I am led to believe is similar to the Supra 6speed. That alone slowed my research down because of all the different debates on what should be used in it.

Then I hit another curve ball...The V-Spec is slightly different to your general GTR.
The V-Spec runs a rear diff cooler, why? Due to the active LSD. Basically it uses hydraulic actuators/solenoids to do some fancy things with bias and lockup etc.
This reservoir is located in your boot.

Below is a long list of information I have gathered to create a large picture. From there you can extrapolate what you will. What you think is best for the car.

My conclusion will most likely be based on the UK guys findings.

--- V-Spec (Victory Specification) --- difference-between-r34gtr-vspec-vspec-ii
All three have the same power output whilst stock.

V-Spec over Standard GT-R has
* front splitter and diffuser
* rear carbon diffuser
* lower stiffer suspension
* exhaust temp and intake temp sensors shown on mfd
* ATTESA E-TS Pro + active LSD at rear

V-Spec II over V-Spec has
* aluminium pedals
* brake upgrade on rear
* carbon bonnet with naca duct
* slightly darker iridium console
* black door trim and seats with white stitching
* more stiff suspension
* clear front indicators

**standard GT-R models come with the non-Pro system and a conventional mechanical differential

**More on the Models - http://www.fabcar.com.au/showroom/nissan/skyline-r34/

**Information - http://www.japanvehicles.com/newcars/nissan/R34/main.htm

--- General Information ---
#The transmission and transfer case of 34r's are sensitive to what oils are used. the transmission oil must be automatic transmission oil ( e.g. royal purple automatic transmission oil)
#Transfer oil has to be genuine nissan Dmatic.

#Engine oil weight that is recommended is 10w40 Fully Synthetic (even 50 weight)

#R34 GTR's - Transmission is a Getrag and requires Auto Trans oil as opposed to the R33 GTR's and R32 GTR's and R34 non GTR's which are not Getrags and use 75w90 gearbox oil.

#Shockproof doesn't belong in a Getrag - Getrag gearboxes need much thinner oil than the normal ones, so they need an ATF

Transmission Oils - http://www.skylinesaustralia.com/forums/

--- Summary ---
#In the V-spec, go for the Fuchs Syn 5 in the front diff and Fuchs Gear 90LS in the rear (they were Silkolene oils, but they have changed name)


#Front Diff = GL-5 80W-90 e.g. Fuchs Titan Race SYN 5 75W-90 Fully Synthetic Gear Oil
#Rear Diff = Differential(s) LS 80W-90 e.g. Fuchs Titan Race Gear 90 LS High Performance Gear And Limited Slip Differential Oil


*****  I read this somewhere which i do not believe! It goes against all my findings *******
"Vspec with active LSD have the same in oil in front and rear diff"
"Only non active rear LSD have other oil in the rear diff."
************

#Gearbox = ATF dexron III / Esso ATF Dextron D-21065 aka V160 / Castrol Transmax Z
 - the post here is right on the money with my findings http://www.freshalloy.com/
 - Internet research show the following work for both box's:
            Esso Dexron D21065, Castrol Transmax Z, Royal Purple Synchromax, Toyota ATF type iv, Toyota V160 oil, Nissan getrag manual transmission oil
            Any other oil (including redline) swell the seals, mess up the synchros.

#Transfer Case = Genuine Nissan Matic D fluid

#Power steering (where fitted) ATF-D2E/D3
#Mechanical Steering GL-4 80W-90
#Brake and Clutch fluid DOT 4
#Coolant AF NIS L2N

#Oilman - Fuchs Titan ATF 4400 in box and Silkolene Boa 90LS in Diff for the V-spec

--- UK R34 GTR V-Spec Owners Manual ---
Recommended lubricants/fluids for the UK R34 GTR V-Spec owners manual.

# Gearbox oil API GL-4 75W-90 ??? hmmmm, I dont know about this...people say it needs an ATF oil
# Transfer box Nissan Matic D ? I agree
# Control system DexronII.tm ???What the hell is this? I wondering if its the a-lsd actuator tank in the boot
# Front diff API-GL-5 80W-90 ? I agree
# Rear diff API-GL-5 LSD 80W-90 ? I agree

--- Getrag V160 Specifications and Details ---
http://www.turbosupras.com/pages/en/pages/technical/V160.htm
Rebuild - http://www.gtr.co.uk/forum/112550-getrag-rebuild.html
Step by Step Rebuild - http://www.kutsujuracing.com/ & http://www.supraforums.com/
Jacks Transmissions - http://www.supraforums.com/ & http://www.jackstransmissions.com
Transmission Illustration - http://nissan4u.com/
Another Repair - http://mkiv.com/

--- RM351E - Toyoto V160 Rebuild Manual ---
Full Rebuild Manual - http://mkiv.com/tmp/6spd_parts/manual/
Transmission Manual - http://www.mkiv.com/manual/manualtt/v160_manual_transmission/index.html
Japanese Article - http://mkiv.com/techarticles/getrag/v161/index.html

--- Toyota V160 ATF (08885-01306) 6 Speed Oil ---
http://www.mkiv.com/techarticles/getrag/specs/ & How to Change the Oil

r34 gtr getrag 6-speed & toyota supra getrag 6-speeds special fluid which has been produced with the proper specifications that getrag requires.

the oil is an automatic transmission fluid and will cost you about 60-120 dollars per litre and you will require 2 of them, should be known as the v160 oil.


Why not to use other fluids - read here about redline issues

Manual 6-speed V160/161 Gearbox
Stock = Toyota V160 oil (PART No. 08885-01306)
Capacity 1.8l's when dry
Toyota V160 Oil (comes in 1L cans - require 2 cans)

ATF Oil Only see here

--- Esso ---
Esso ATF D21065 "for ZF transmissions as used in Peugeot and Rover"
*lubricant: 1.8 LT – ATF ESSO Dexron D21065
Esso is the overseas name for ExxonMobil

--- Transmax z ---
castrol transmax Z ATF
- transfer case and gearbox

Castrol Syntrax for R33/R32 (Nissan gearbox) and Esso ATF-D for R34 (Getrag gearbox)

Transmaxz if fine in the transfer case and if your picky you can go the expensive oem stuff (Toyota V160) which i used but i used transmax in the transfer case

Castrol Transmax Z  is a fully synthetic automatic transmission fluid with outstanding oxidation and friction stability.  It is dyed green for easy identification.
Castrol Transmax Z  is a DEXRON III type automatic transmission fluid intended to satisfy all DEXRON III, II E and D requirements.  It helps provide a smooth shift and long life in both passenger car and heavy
duty automatic transmissions.  Also recommended for power steering systems where automatic transmission fluids are recommended. [Source: Castrol]

--- Royal Purple Synchromax --- http://www.supraforums.com.au/

The original Toyota oil is a simple Dextron II oil, nothing special about it. BUT when choosing oils you still have to be very careful.

What you need:
Pure Dextron II, NO ADDITIVES!!!!!!!!

Royal Purple Synchromax is a Dextron II oil, and is perfectly sufficient, I have been using it in all my Dextron II boxes with no problems (TKO 600 and V160)

The issues come with Dextron III and Dextron Based oils with additives. Dextron III based oils most often have a seal additive to help lubricate and tighten the seals in Dextron III boxes (autos) and this additive will swell and damage the seals of a V160.

So in summary, any oil, so long as it is a Pure Dextron II will work fine.

--- NISMO COMPETITION OIL type 2189E (75W140) 2L by Motul ---
via http://www.nismo.co.jp/en/products/competition/mission/getrag.html
Strange than Nismo recommends a heavy oil. It sounds like they are talking about the gearbox but in fact i believe they are talking about the front diff.

NISSAN MOTORSPORTS INTERNATIONAL. Lubricant for hypoïd differentials with limited slip system operating under heavy loads with shocks and low revolution speed or moderate loads and high revolution speed. Because Type 2189E (75W140) is the oil recommended by Nissan Motor Company for the Nissan GT-R (R35), its usage is covered by the Nissan GT-R (R35) warranty. Type 2189E (75W140) delivers the same dynamic viscosity as a 190 grade oil while providing a base grade of 75W. It is an ester compound, 100% synthetic oil, with outstanding low temperature properties.

--- Amsoil Syncromesh and Mobil 1 ATF --- 
Two other oils that have been found to suit a manual box that requires an ATF oil.

--- Nissan Matic D ATF ---
is actually lower spec (dextron 3 equivalent) compared to Transmax Z (fully synthetic)
Nissan Matic D oil from nissan. and it cost around $80 for 5L Bottle so its all good.

Jap tuners say to only use the genuine Nissan Matic-D in the transfer cases. Then again it's suggested Matic-D is nothing more than Castrol ATF/Mercon I

--- Diff Oils ---
[something i found when reading Skyline forums, clearly it doesn't relate to a V-Spec or a GTR. I believe Getrag deserves an ATF oil, but a worthwhile read]

Front diff is a GL5 80w-90, the rear diff is also a GL5 80w-90, with the gearbox being a GL4 75w-90.
So, you can either go for a deicated diff oil for the diffs (gl5) and a seprate one for the gearbox (gl4)
Or you can use a one stop shop like the Silkolene Syn5 75w-90 that meets both the GL4/GL5 spec so can be used for both. [something i found when reading Skyline forums, clearly it doesn't relate to a V-Spec or a GTR. I believe Getrag deserves an ATF oil]

- OR -

front diff motul gear 80w90
Gearbox motul gear 300 75w90
rear lsd motul 90PA

R34 GTR uk manual they also recommend dexron 2 for the hicas and attessa, and nissan matic D for the transfer box

--- Volumes ---
Gearbox 4.1 (one user quoted 3L to fill theirs up)
Rear Diff 1.6L
Front Diff 1L (one user quoted 1.2L to fill theirs up)
Transfer box 1.8L (one user quoted 2.8L to fill theirs up)

--- More on Oils ---
Make sure you get a l/s (limited slip) oil for your rear diff.

Gearbox: GL4 75w90
Transfer box : dexron II(atf)
Front Diff: GL5 80W90
Rear diff: GL5LS 80w90

--- Engine Oil ---
engine oil is nothing but motul, most will agree that 300v or 8100xcess

--- Standard R34 GTR --- http://www.gtr.co.uk
Differential Fluid
GTR: - Front GL-5 85W-90 Every 60,000 miles or 2 years Non lsd
GTR: - Center Nissan Automatic Fluid D Every 60,000 miles or 2 years ,just drain it out then refill pot in boot ,don't know key sizes though
GTR: - Rear LSD GL-5 80W-90 Every 60,000 miles or 2 years
GTR: gearbox (manual) 75w90 fully synthetic

--- Service Tips ---
Reservoir in the boot is for the Attessa system, you can use ATF to top up if needed, nothing to do with filling the transfer box. It needs bleeding if ever you disconnect the pipe to the back of the transfer box. The transfer box takes ATF too, just over a litre from memory. Both diffs take just over a litre too and the box takes about 3 1/2 litres and a 75W90 oil would be best... The box is a pain to fill without a pump.

Bleed the Attessa. Remove the rubber cap from the nipple, start her up, get somebody to move the steering wheel while you undo the nipple

Fill the transfer box you can fill it from the gearstick hole in the car (pretty sure this didn't apply to Vspec or GTR)

--- Oilman --- http://www.gtr.co.uk/forum/143069-change-differentials-oil-silkolene-2.html
-> Below was posted in response to a R33 VSpec query.
-> But the R33 is slightly different from the R34

Engine 5L
Silkolene PRO S 5W-40 Ester Synthetic Oil For High Performance Engines
Gulf Competition 5w-40 racing engine oil | motor oil
REDLINE High Performance Synthetic Motor Oil 5w-40
Motul 300V Power 5W-40 Racing lubricant for racing cars
Millers Oils CFS 5w-40 Competition Fully Synthetic Engine Oil.
Millers Oil CFS 10w-50 Competition Fully Synthetic Engine Oil.
Silkolene Pro S 10W-50 Ester Synthetic Oil

Filter
OIL FILTER: UFI spin-on oil filter 23.266.00

Gearbox 4.1L
REDLINE Synthetic Manual Transmission 90 MT90 75W-90 GL4
Motul GEAR 300 75W-90 Racing gearbox and differential lubricant 100% Synthetic ? Ester based
Millers Oils CRX 75w-90

Rear Diff 1.6L
Fuchs Titan Race Gear 90 LS High Performance Gear And Limited Slip Differential Oil
Motul 90 PA Lubricant limited slip differential (LSD) Extreme pressure

Front 1L
Silkolene SILKTRAN SYN 5 75W-90 Fully Synthetic Gear Oil
Silkolene BOA 90 LS High Performance Gear And Limited Slip Differential Oil
Millers Oils CRX 75w-90

Transfer box 1.8L
Amsoil Synthetic Automatic Transmission Fluid ATF
Fuchs ATF 4400, Fuchs 4400 automatic transmission fluid
Motul MULTI ATF Fluid for automatic transmissions

Brake Fluid Approx 1L
MOTUL RBF 600 Factory Line racing brake fluid
Castrol Response Super DOT 4 Synthetic Brake Fluid
Silkolene PRO RACE 2000 High Boiling Point Competition Brake Fluid

Power Steering
Motul DEXRON III Fluid for automatic gearboxes, Power steering systems
REDLINE POWER STEERING FLUID
Opie Oils - Fuchs TITAN ATF 4000 Multifunctional Automatic Transmission Fluid

--- Cam Belt Service ---
http://www.gtr.co.uk/forum/154628-how-do-cam-belt-service.html

--- Other Sites ---
Buying GTR Parts - http://www.thegtrshop.com

v160 Supra Gearbox - http://mkiv.com/tmp/6spd_parts/
The oil - Getrag-V160-Oil-Esso-Toyota-Nissan

Vspec Oil - http://www.skylinesaustralia.com/forums/topic/370734-just-bought-r34gtr-vspec-ii/

Blog - http://er34.blogspot.com.au/

RB26DETT Spring Cleaning - Where to begin Part I

I have been asked to take care of my friends GTR VSpec. First thing to do is study! All cars follow the same principles. But it is always nice to understand what your working on.
This is the first part of many more to come about understanding a Skyline. A look into the RB26DETT and a dive into what a V-Spec is.

*NOTE: The aim of this fact finding mission is to find what works for a GTR R34 V-Spec. But I decided to pull various information together.

From: https://sites.google.com/site/tyndago/r34-nissanskylinegt-r
--------------------------------------------------------
Stock Recommendations - Maintenance Requirements for RB26DETT/ R34

Air filter element - Fram CA4309

Oil - Mobil 1 10-30 , 15-50
-> 3,000 miles or 6 months

Oil Filter - OEM 15208-60U00 , Fram PH3682, OEM(R34) 15208-9E000
-> Every 3,000 miles

Spark Plugs - NGK PFR6A-11
-> Every 60,000 miles


Timing Belt - OEM 13028-20P25
-> Every 60,000 miles

Manual transmission fluid - GL-4 75 –90
-> Every 60,000 miles or 2 years

Differential Fluid
- Front - GL-5 85W-90
-> Every 60,000 miles or 2 years

- Center - Nissan Automatic Fluid D
-> Every 60,000 miles or 2 years

- Rear - LSD GL-5 80W-90
-> Every 60,000 miles or 2 years

Fuel Filter - Purolator F44663 , 1996 Infiniti J30
-> Every 15,000 miles

Brake Pads
- Front   AP592   R592  PFC 592  HB 194
- Rear  AP961

Belts - Power Steering belt, AC belt, Alt/ WP /Fan

--------------------------------------------------------
Spark Plugs

spark plugs - stock = NGK PFR6A-11
BCPR7ES 0.8mm

--------------------------------------------------------
Fluids

As for gearbox oil, only use the proper Getrag stuff (Toyota V160 or genuine Nissan fluid etc). You will see recommendations like redline shockproof but these are for nissan 5 speeds, getrag boxes use ATF fluid so thorough research is needed if going with another brand like RP syncromax etc otherwise you will could damage an expensive gearbox if brand shopping.


------------------------- Gearbox ------------------------- [pictures above]

As for gearbox oil, only use the proper Getrag stuff (Toyota V160 or genuine Nissan fluid etc). You will see recommendations like redline shockproof but these are for nissan 5 speeds, getrag boxes use ATF fluid so thorough research is needed if going with another brand like RP syncromax etc otherwise you will could damage an expensive gearbox if brand shopping.


--------------------------------------------------------
Information from Owners Service Manual R34 V-Spec - http://www.skylinesaustralia.com/
[I also confirmed this info from a friend that has access to Nissan]

Legend:-
I = Inspect and Correct or Replace As Necessary
R = Replace
L = Lubricate

Engine And Emission Control Maintenance
Major Service of 80,000Km and 100,000Km

Engine Oil = R except for Turbo Engines which requires a change every 6 months or 5,000Km whichever is earlier
Oil Filter = R (and more frquently under harsh driving conditions)
Drive Belts = I
Engine Anti-freeze Coolant (ethylene glycol) = R
Cooling System = I
Air Cleaner Filter (paper type) = R
Intake and Exhaust Valve Clearance = I if noisy
Fuel Lines = I
Spark Plugs (Platiunum) = R (at 100,000Km)
Heated Oxygen Sensor (exhaust gas sensor) = I
EVAP Vapour Lines = I
Timing Belt = R
Fulcrum Bolts = I

Chassis And Body Maintenance
Major Service of 80,000 &amp; 100,000Km

Brake, Clutch &amp; Auto Transmission (for level and leaks) = I
Brake Fluid = R
Brake Booster Vacuum Hoses, Connections &amp; Check Valve = I
Power Steering Fluid &amp; Lines (for level and leaks) = I
Brake, Clutch &amp; Exhaust Systems = I
Manual Transmission Gear Oil (for level and leaks) = I
Differential Gear Oil (for level and leaks) = I (to be checked every 2 yrs if car is more than 10 yrs old)
Limited-Slip Differential Gear Oil = R
Transfer Fluid = R
Steering Gear &amp; Linkage, Axle &amp; Suspension Parts = I
Propellor Shafts &amp; Drive Shafts &amp; Boots = I
Wheel Alignment &amp; Wheel Rotation = I
Brake Pads, Rotors &amp; Components = I
Locks, Hinges &amp; Hood Latch = L
Seat Belts, Buckles, Retractors, Anchors &amp; Adjusters = I
Foot Brake, Parking Brake &amp; Clutch (for free play, stroke and operation) = I
Ventilation Air Filter = R

--------------------------------------------------------
100k km Service for the R34

Standard Kit Components:
Genuine Nissan Timing Belt (Optional Upgrade to Trust/GReddy or Gates Racing)
Genuine Nissan Water Pump (Optional Upgrade to Nissan N1 Item, Where Applicable)
NSK Timing Belt Idler Bearing (Ex RB20E)
NSK Tension Belt Idler Bearing
Genuine Nissan Tensioner Spring
Genuine Nissan Cam Seals
Genuine Nissan Front Main Crank Seal
*NSK are the original equipment manufacture (OEM) of the Nissan timing belt idler & tensioner bearings.

--------------------------------------------------------
Turbos for the GTR
Garrett GT2860R-5
HKS GT-SS's or Garrett 2860R-7's (also R34 GT-R N1's) are what you want if you're staying on standard internals.

Garrett turbo 707160-7 which is almost the same size as HKS GTSS will produce around 300 hp each with fast spool up almost as oem these are also very similiar in size to the R34N1 turbos.

Garrett turbo 707160-5 which is almost the same size as HKS 2530 will produce around 350 hp each and be alittle laggier than the -7 and oem but will have better top end they will still produce power after 7500rpm which the -7 wont.

--------------------------------------------------------
Manuals and Information 

Nissan Skyline Parts  - Nissan Skyline - R34 GTR V Spec

R34 Workshop Service Manual
R34 Workshop Service Manual - Supplement I
Nissan Manuals - http://manualmotor.blogspot.com.au/

Interesting Build: http://www.skylinesaustralia.com/forums/topic/409259-r34-gtr-vspec-build/
Germany Build: http://www.skylinesaustralia.com/forums/topic/383498-my-bnr34-vspec-uk-model-in-germany/