Tuesday, July 28, 2015

WA Sprint Championship - Overall Results - Round 5 - 26 July 2015 - Course: Montacute - 4.30km


Second time out on the new ECU, yet to work out some of the bugs.
I have put together my temp sensor, but yet to install it.
I redesigned a new catch can, bled the brakes.
Need to get back into building the engine, no time :( busy working. At this rate August is a write off, so it will have to wait till September.


I also tried running 215/45 on the rears and 225/45 on the fronts. Spun out twice. Pushing the car a bit too much when it was cold.
I'd be keen to try tire warmers.


Sunday, July 12, 2015

Tribute - My Daily - B18 Civic EG - 21xxxxKm


What started out as a project car soon became my daily as I started modify the Colt further and further.


I think it has now been with me over 3years! Maybe over 4.
But in that time it has been a life saver.  Its been my ute more times than I can count.
Helped me move houses as well.
6months ago she got written off, I was hit in the rear 1/4 panel (passenger side).


I bought it back for $150 (the salvage price).
I don't understand how someone can put a price on my car, as I was the one who got hit.
They valued it at just over $2000.
It is worth a lot more than $2000.  I looked on gumtree, couldn't find anything that had been looked after.  So I kept it, fixed up some of the issues.
Rear trailing arm seems to have some serious toe still.
Body panels need some work, one day I will get around to it.
Lately its received some SSR HART wheels with R1R 195/50/15.
A brake booster, a clutch master + the needed flushes.
New CV boots, the timing belt change and a bunch of other small things.


/project-civic-eg-with-b18c.html
/b18c2-eg-tlc-timing-belt-installation.html
/honda-p30a-rebuildoverhaul-from-b18c-eg.html

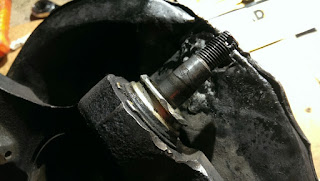
Lower and upper ball joint boots are shot.


Took out the passenger shaft for a new boot
I need to flush the PS fluid.


Working out my engine mounts.
Tempted to change them?


Worlds crappiest job, CV BOOTS!!
Bought new CV joints, its the wrong type.
I believe I have integra shafts.




Tuesday, July 7, 2015

WA Sprint Championship - Overall Results - Round 4 - 28 June 2015 - Course: Big River - 4.35km


First time out with the new ECU, some basic tune tweaks and my tires that are forever aging.
The new ECU is behaving nicely, just some false knock to tune out.


On hard shifts its picking up false knock.
Apart from that, I can't complain.
Oh but my catch can was leaking and making a mess.  I must revisit the design.


My competition -> another RColt that has gotten very serious compared to our first outing.

Saturday, July 4, 2015

Template for ECU Mount & Dash Switch Mount


Here are the templates I made for my conversions.
See more here: /adaptronic-440-install-wires-heat.html
They aren't the most accurate, but that worked for me.
I drew it on graph paper, each big square is slightly under 1cm.

Above is the one that reuses the stereo bracket mounts.

The one below reuses the 3 cover mounts on the powersteering ecu. The MDF board I cut out was the size of an A4 sheet.  The below is a 1:1 scan of the A4 sheet and the mounts.


Friday, July 3, 2015

My custom main distribution frame - Ralliart Colt ECU Install - ABS VSS Pickup Circuit


Part of the ECU install was to clean up all the wiring.

I stripped out so much from my old alarm and gauges, old ECU.
I wanted a simple panel that I can trouble shoot, chop and change.


<- Switch goodness


VSS ->


Using the ABS VSS sensors to feed into the Adaptronic for traction control.


Implementing a solution for using existing inductive abs vss sensors!
http://www.adaptronic.com.au/


Sunday, June 28, 2015

Adaptronic 440 Install - Wires, heat shrink, cutting, splicing, crimping....


Working to 1am every night this week, plus two weekends.
The end result...I am very impressed but still a few things to do.  It is far from perfect.
But it is clean, functional and it's alive.
Fuel system is holding, no leaks.  Tune is running well, just a few issues with false knock.
From injectors to pump, filter, hard wiring relays, switches, ecu, O2 sensor.  There has been a significant change to the car.


 - I need to fix the temp sensor, I need a 28mm thermostat adapter (wire direct to ECU)
 - two stage LED indicators - one to show relay is armed (e.g. fuel pump) another to show it's running.


 - cleaner dash switch cluster (out of ally?)
 - extend stereo deck loom, just going to keep it simple - deck + 2 speakers
 - install Defi Link + gauges + custom warning lights
 - finally fit the bigger brake kit
 - fix up guards

list goes on......


My soldering iron I bought 8 years ago? and the one I bought for my mate
I swear it costs more now ($160) compared to when I got mine


Using what I could find at the local electronics shop.


The gauge wiring loom.


Just some of the mess.


Some of the tools.


Too many wires to make it look clean @_@


Saturday, June 27, 2015

Love Juice Phase II - FPR 1200 - Fuel Pump DW300 - E85 300LPH


Fuel pressure kPa Vacuum hose connected Approximately 230 = 2.35kgf/cm2 = 33.36psi
Vacuum hose disconnected 289 − 299 = 2.95-3.05kgf/cm2 = 41.92-43.37psi


Part I
/love-juice-phase-i-fpr-1200-zeitronix-e.html

Historical:
GSS342 255LPH
/fuel-pump-install-z27ag.html
/e85-plans-fuel-pump-injectors.html


First and last time I will use AN fittings.  It was really expensive :(
For no real output.
In the aim of doing it right the first time, the outlay was $$$$
Also a pain to install and assemble


Special 1/4" hardline adapter from speed flow, I didn't like the other designs.
Unfortunately they only come in AN4, so I had to get a converter for AN6

SpeedFlow Tube Adapters 618-04-04
-4 to 1/4" Male


This is the new style that doesn't require flaring 37deg
It uses a compression olive, inside it has oring also.
Can be used on steel or aluminium hard line.


Just some of the items used on such a simple task.


New fuel pump, new filter, BUT NO NEW SOCK.
Fuel sock was too big :( I had to use OEM

Tube Nut 818-04
Tube Sleeve 819-04
Tube Adapter 618-04-04


Flare Expanders
951-04-06 Female -4 Male -6


Out with the old, in with the new.


Dont forget to cut the tabs off.


Changing the filter housing.


I also wired in some heavy duty cables and put the pump on its own relay.


The new filter, I was provided the wrong part number earlier.
As seen here -
/mr526974-filter-assy-fuel-tank.html


Z653 fitted, don't forget the rubber grommet on the fuel pump.