Sunday, July 15, 2012

Fitting Torsion Bar Camber Shim to RColt

trying to find spherical washer/self-aligning to reduce stress on the bolt.
at the moment i have the highest tensile bolt i could get. greater than 10.4 i believe it was.
had to get a internal hex screw head apparently the other they didn't have in such a high tensile.
M10x30mm, i went slightly longer by 5mm (stock from memory is M10x1.5mm 25mm long)
Shim was made to 1.5degrees. By rough guesses it created a camber of approx 8-10mm
http://www.smallparts.com.au/store/partslist/washersselfaligning/washers/wide/1/
I have added alot of front camber. Maybe 4 degree. Similar to http://minkara.carview.co.jp/userid/323248/car/220836/706405/note.aspx

I made the shim like so for the stress dispersion of the anchoring to the hub. Hence the full face shim design rather than some tapered washers.

rough estimate with camber

without camber


Camber - /alignment.html
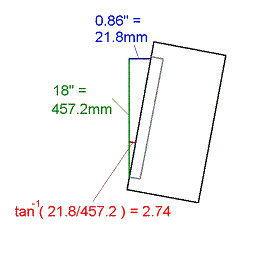
Checking camber is a heck of a lot easier than toe. The main tool I use is a slightly modified level. I cut a piece of aluminum square bar stock to match the height of the rim. This is not the listed wheel diameter (which is the diameter that the tire is mounted on), but the wheel diameter plus the size of the mounting rim that you will measure against. In my case, a 17" wheel is really 18" (457.2mm) from top to bottom.
I just taped the bar stock with electrical tape, so that it could slide a bit on the level. This is good because I want the end of the bar to sit on the lower part of the wheel, not the tire. So I slide the bar so the level can sit on the ground while the bar sits nicely on the lower rim.
With the level against the wheel, place the digital caliper between the rim and the level (as shown). I really pull the level out about 1.5" or so to start with, and then slowly push it in (which compresses the caliper too) as I watch the bubble in the level. When the bubble is perfectly centered, get the reading from the caliper (0.863in = 21.92mm in the pic).
The camber angle is easily calculated with the formula:

inverse tan( __mm measured / _mm bar length ) = __ deg camber

Example:
inverse tan( 21.92mm / 457.2mm ) = 2.7 deg camber
Or, if you like using inches (I use inches when measuring camber):

inverse tan( 0.863in / 18in ) = 2.7 deg camber

Friday, July 13, 2012

Okuyama - Carbing Frame Brace Install - 694 327 0 - Z27AG


Product Specs from http://www.rhdjapan.com/okuyama-carbing-center-frame-brace-colt-ralliart-version-r-56848
Brand: OKUYAMA
Product: Carbing Frame Brace - Center Colt Ralliart Ver.R Z27AG
Part Num: 694 327 0

FEATURES:
- Whats is Frame Brace?
Frame brace increases rigidity of the vehicle body by adding bracing points to the original vehicle core position. Front, center, and rear braces are available for various vehicles. Steel (STKM13A) construction. Brackets and the shaft are welded together to make single piece construction for lighter weight and higher rigidity.

1. Front type
Frame Brace connects front suspension member and first front vehicle frame.
Its add rigidity of front overhang for better steering response and stability during cornering.

2. Center type
Frame Brace connects front suspension member and first front vehicle frame.
Its add rigidity of front overhang for better steering response and stability during cornering.

3. Rear type
Weak point of the hatch-back type vehicle aft body has strengthened by installing this Rear Frame Brace.
Waddling sensation of bad trail lane changes and larger wheel (inch up) vehicle improves for a smoother ride.
Carbing Rear Frame Brace is installed above the spare tire space. This makes no interference in trunk space.
This device is strongly recommended for the vehicles with big opening in the rear part of the body such as Rear hatch back type vehicles and Mini vans.

SPECIFICATIONS:
Position: Center
Material: Steel (STKM13A)


I had some UR Bracing on the rear which i have now removed. The Carbing brace was a little tricky to install. Lucky with my air ratchet it was made much easier. As the front bolts just hang in the hole.
I think it really needs some glue as you try to put the nut on it, it pushed the bolt inside the recess/hole.


Very tricky to install these. I used a screw driver to hold the thread, so that the air ratchet could catch the threads when putting the nut on


Old UR Racing vs the Carbing design.

UR Rear sway bar as well as rear ARB.
Have now been replaced by some decent JDM spec bracing.


Angle grinder to cut it off.


Rear Stabilizer Bar Mitsubishi Colt Z21A Z27AG - 525 311 B14 - Installation

I finally got around to installing my rear cusco swaybar http://ayu452.blogspot.com.au/2012/01/cusco-525-311-a28-525-311-b14-525-561.html
Product: Rear Stabilizer Bar Mitsubishi Colt Z21A Z27AG Z27WG
Part Num: 525 311 B14


Friday, July 6, 2012

Nakai-san @ RWB


Sweet new video by Luke Huxham at maiham-media.com for eGarage.com
Nakai-san has some really good quotes!

Egarage article http://www.egarage.com/videos/rwb-rauh-welt-begriff/
Vimeo Video http://vimeo.com/36334449
and Autoblog link http://www.autoblog.com/2012/02/21/egarage-interviews-akira-nakai-of-rwb-in-latest-video/

"Whether people's opinions are good or bad, i welcome both, feedback is a good thing.
Even if people say they don't like my work it still makes me very happy.
The fact that my work caught their attention makes me happy."
 - this applies a lot to me when racing a hatch back haha
and

"There is no such things as "ugly" cars. It's a hobby, we all like different things."

Rear Shim Rcolt Draft Design

I previously found some info on the Minkara website as seen here http://ayu452.blogspot.com.au/2012/07/rear-camber-draft-camber-shim-for-colt.html
At the moment i have started measuring and drafting possible camber spacers. At the stage where i need to get a bunch made up with varying angles to see what works and to double check the template.


Blog Entry
Youtube Video Of Brake Removal


Wednesday, July 4, 2012

Strengthen OEM Front Strut Bar and Engine Mounts


I noticed the super weak strut bar mount when changing suspension. One thing i wanted to do is reinforce it.
Part of the reason to reinforce it is so that i can mount an engine torque dampener e.g. Ingalls or Spoon
Came across someone in Japan that has done exactly that and highly recommended it via

Window Weld
Along with strengthening the strut bar, I want to also strengthen the engine mounts and do everything in one hit. Someone in Japan has modified the stock gearbox engine mount. They used a Bostik rubber which is used to install windscreens. Another used a DiY urethane pour kit.
A common term used on the internet is window weld engine mounts e.g.


Urethane Casting Compounds / Resin Casting / DiY Polyurethane Engine Mounts

From what i found they are commonly using a shore rating of 60A.
90A was rated too rough for a daily. One thing you can do if you do the 90A is drill a few holes in the mount if it does seem to rough and noisy.
Try googling for DIY Polyurethane Engine Mounts and shore rating to find what you are looking for.
Shore scale see here
e.g. a standard car tire is around 60A, 75A for a garden hose and 90A/45D is an extension cord.
A is the softer rating. Where D is that harder rating e.g. 70D is skateboard wheels.


Rear Camber - Draft Camber Shim for the Colt Z27AG Rear Hub

The things you gotta do to have the wheels you love. Rear camber ^_^ The colt doesn't have any hardware to adjust the rear camber. I have been researching camber shims, camber washers, tapered shims and EZ Shims. Heating the hub till it cherry red and letting it cool to introduce some camber etc.
One guy in japan is a step ahead of me. He is using camber shims/washers to help correct his camber.
I'm chasing about 1.5 degrees on the rear with neutral toe.

Well not so much current because now i have camber top Blitz ZZR units on the front of the RColt. Previous alignment was made via 12mm camber pins and my Tein Super Compact running OEM top mounts.

My goal is to end up with a simple bolt on shim as seen here for the Suzuki Swift which uses shims on inside and outside. Must be so there is less stress introduced on the bolt Suzuki Swift Shims 


Rear shot of  rear hub and the ABS Sensor +4 hub bolts 
Rear hub assembly unbolted from the mount
Some specs from Minkara
Adding spacers to correct toe and camber. 
camber shim i am designing.


Semi Solid Shifter Linkage from Minkara Forums - Z27AG MT

After rebuilding my shifter linkage with a solid custom bush i been keeping my eyes open for what others do. Basically, everyone will eventually need to resolve this issue. The rubber grommet gets old and sloppy. I broke mine when removing it from the forks.
I was tempted to use some DSM bearing kit (or skateboard bearings) and change the ball stud to a rod n split pin.
But that would mean i would have to drill the ball stud out of the gearbox shifter fork assembly.
This is what i did:
Shifter Linkage Bushes http://ayu452.blogspot.com.au/2011/08/shift-linkage-bushes.html
Broken Linkage http://ayu452.blogspot.com.au/2011/08/gearbox-drop-part-7-broken-gear-linkage.html
Custom Linkage http://ayu452.blogspot.com.au/2011/08/solid-shifter-linkage-and-custom.html

I found this on minkara http://minkara.carview.co.jp/userid/398319/car/363133/1101034/note.aspx
These guy has some creative solutions to some tricky little colt problems. He has done what i have been contemplating for awhile.
Basically he wanted to re-support the destroyed bush.


Google Translation:
You have two places where drill through with a red circle for the future here.  You have to drill through the insistent about this two places before and after the stroke is not affected.  Drill about not rotating smoothly enters muzzles - is best.


Sunday, July 1, 2012

B18C Upper & Lower VTEC Solenoid Rebuild & Gaskets

Been having some oil leaks. From what seams to be around the solenoid. So I did a little research and this is a common problem.
Order some gaskets from ebay and in they went.
Apparently all the solenoids use the same gasket.
Took half an hour to swap.
I didn't have any torque settings. But being a gasket I always slowly do up the bolts in three stages.


I rubbed some oil on the gasket to help it compress.
I pulled the solenoid and shaft apart and gave it a clean with degreaser.
Three bolts to remove it from the block and a couple cables to take off.
Oil pressure switch i believe is one, the other is the solenoid control and the other is a clip holding the bracket for the ignition leads.


OEM Honda Si B16A2 GSR B18C1 Type R B18C5 DC Upper & Lower VTEC Solenoid Gaskets
Goddam she was dirty, no wonder there were issues.


According to the OEM Packets:

15825-P08-005
36172-P08-015


Gave the surface a clean, remove any debris


I believe this metal spacer is for an oil feed?
Remove it to get to the shaft n spring.


And after the civic service. On  to the Z27AG for some rewiring.